So with the number of deep and enduring stains of passata, coffee, olive oil...and i really don't know what the rest of them are... that occur in our kitchen... it was really only a matter of time before i imposed the "apron rule" on SuperD.
He readily agreed... as long as there were no hearts or applique ginger-bread men on it ("c'mon....would i???"... she says, deeply disappointed because gingermen would totally have rocked!) So i tried to make one that would live up to his superhero status, as follows:
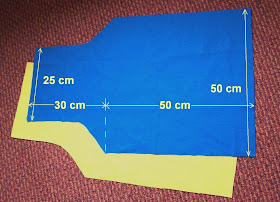
1. Cut 2 apron shapes using the measurements given in the pic below. (one will be the lining)
 2. You'll need to secure the "decoration" with iron-on fusable webbing before sewing. I made a template from a superhero crest (i can't post the crest as it breaches copyright, but it was pretty easy to find online) and started to cut out the pieces in the 3 different colours.
Uh-oh....see what i've done there?? Yup, don't forget to turn the template upside down when cutting out or you will end up with pattern in reverse when you turn it over to iron and fuse it on!!

NOOOOOOOOOOOOOOO!!!
-learn from my mistake...don't watch Colin Farrell movies when trying to concentrate on sewing
3. Here are all the (correct) pieces (bondaweb on the back) ready for ironing. Just iron down the base material to the correct position on the apron front first and then layer on all the rest of the little pieces. Easy!

He readily agreed... as long as there were no hearts or applique ginger-bread men on it ("c'mon....would i???"... she says, deeply disappointed because gingermen would totally have rocked!) So i tried to make one that would live up to his superhero status, as follows:
1. Cut 2 apron shapes using the measurements given in the pic below. (one will be the lining)
 2. You'll need to secure the "decoration" with iron-on fusable webbing before sewing. I made a template from a superhero crest (i can't post the crest as it breaches copyright, but it was pretty easy to find online) and started to cut out the pieces in the 3 different colours.
 Uh-oh....see what i've done there?? Yup, don't forget to turn the template upside down when cutting out or you will end up with pattern in reverse when you turn it over to iron and fuse it on!!

NOOOOOOOOOOOOOOO!!!
-learn from my mistake...don't watch Colin Farrell movies when trying to concentrate on sewing
3. Here are all the (correct) pieces (bondaweb on the back) ready for ironing. Just iron down the base material to the correct position on the apron front first and then layer on all the rest of the little pieces. Easy!

4. Then for the sewing fun! Just sew running stich around all the decoration pieces to secure...doesn't it look great??

5. Then you'll want to put the finished apron front and lining, wrong-sides-together and sew around the edge leaving 1 cm seam allowance.
6. Sew coordinating bias binding around the edge.
 7. Cut, fold and sew 3 more pieces of bias binding, to form the neck strap (25"), and the two ties (30" each). Sew these into position.

It really is that easy!!!!
(but don't forget the Colin Farrell thing...seriously...i was DEEPLY displeased)

Is there any end to your talents? Apron looks fab. I hope Super D isn't going to wear it when cooking with pasata, coffee or olive oil, but then again that was the point of making it in the first place - ah well, just be VERY careful D don't spoil it now!
ReplyDeletelove m. xoxo
You are the super crafter!! What a wonderful apron.
ReplyDelete