
 I apologise for all 10 monthly posts in one go, but i've been out of the country and this is the first opportunity i've got for posting this month!!
Showing posts with label garden. Show all posts
Showing posts with label garden. Show all posts
Monday, 31 October 2011
Pumpkin fun - mark 2
I apologise for all 10 monthly posts in one go, but i've been out of the country and this is the first opportunity i've got for posting this month!!
Pumpkin fun - mark 1
So for my Halloween party this year i got 2 large pumpkins for carving. The first one i'm not really sure where i was going with the features - it was going to be cat-like, then I gave her eyelashes....and um...well it's not exactly very scary is it?? I'm going to have to go classic scary face with the second one.

Saturday, 9 July 2011
Barbie's Dreamhouse
So poog got 2 chickens a while ago and bought them the cutest little dream-hutch to live in. She decided to call one Hen-rietta and one BBQ (a big of dark humour there i think) and then it occurred to her how well the names worked together "Hen(rietta) & Barbie(Q).
It didn't really take much imagination then to decide what to call the hutch - it had to be the Dreamhouse, in memory of the many (many) days we spend playing Barbies (& Sindys) with our very own dreamhouse - it had an art deco elevator and everything!!!! *sigh*
 SuperD made them a sign for their little hutch's front door. While watching him cut out the little pieces of metal from a tin can i was very confused!! I think the final result is adorable!! And i know the chickens loved it too.
It didn't really take much imagination then to decide what to call the hutch - it had to be the Dreamhouse, in memory of the many (many) days we spend playing Barbies (& Sindys) with our very own dreamhouse - it had an art deco elevator and everything!!!! *sigh*
 SuperD made them a sign for their little hutch's front door. While watching him cut out the little pieces of metal from a tin can i was very confused!! I think the final result is adorable!! And i know the chickens loved it too.
Thursday, 30 June 2011
metal markers
So the cardboard markers i made before for my windowsill chillis aren't going to cut it in the greenhouse. The atmosphere is too humid and the glue would melt in the heat. So i was stuck for a while for an easy way to label all the greenhouse plants. But then i though of something...
 I was emptying one of my store cupbaords in work when i came across a pile of floppy disks. We don't even have floppy drives in the office anymore so i was piling them into the bin when i caught sight of the little metal guard piece and thought i could recycle them. We have a metal punch set that i bought SuperD last christmas and the disk guards were the perfect thickness of metal to punch in.
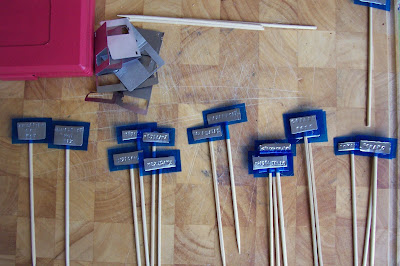 The edges were a bit sharp and rather than be bothered to file them all down i just stuck them onto blue acetate pieces and glued them to kebab sticks. These are all my varieties of chilli pepper...i'm growing 7 types this year!
 Yay - confusion is banished from the greenhouse - "Now get growing!!"

 I was emptying one of my store cupbaords in work when i came across a pile of floppy disks. We don't even have floppy drives in the office anymore so i was piling them into the bin when i caught sight of the little metal guard piece and thought i could recycle them. We have a metal punch set that i bought SuperD last christmas and the disk guards were the perfect thickness of metal to punch in.
  The edges were a bit sharp and rather than be bothered to file them all down i just stuck them onto blue acetate pieces and glued them to kebab sticks. These are all my varieties of chilli pepper...i'm growing 7 types this year!
 Yay - confusion is banished from the greenhouse - "Now get growing!!"
Friday, 27 May 2011
stones from the sea
Since the theme at our wedding was to be the seaside, I choose some very scruffy natural looking pebbles from the beach near to our house on which to write the names for the guests' placecards. I glued little shells and mini dried starfish on them just to add something fun.
 The groom was the only one with a black pebble and these two still sit on the windowsill in our kitchen - a memory of a beautiful day.
 The groom was the only one with a black pebble and these two still sit on the windowsill in our kitchen - a memory of a beautiful day.
Friday, 29 April 2011
plant labels
we're having a competition in work to see who can grow the most and biggest chillis this season. We've all chosen different varieties and currently they're all relaxing in my greenhouse until they're mature enough to make the trip into work with me.
 A super-simple paper craft to make little name badges for each of the contenders...this one's mine "Come on hungarian hot wax!!! Mamma's hungry!"
 One of the varieties is razamatazz and it produces purple chillis! cool huh?
 The winner (or should that be loser?) has to make food for the rest of us using their chillis...i can hardly wait! yummy!

 A super-simple paper craft to make little name badges for each of the contenders...this one's mine "Come on hungarian hot wax!!! Mamma's hungry!"
 One of the varieties is razamatazz and it produces purple chillis! cool huh?
 The winner (or should that be loser?) has to make food for the rest of us using their chillis...i can hardly wait! yummy!
Saturday, 25 December 2010
tiny table trees
I was again looking for place markers that would be festive and having done trees before in 2008 that were made of paper...i decided this time to go for the real thing! These were "harvested" (read: "pinched") from a tree in the centre of our village and poked into corks.
 I gave the needles a little trim around the top so that they had a more tree-like shape and would look less like bottle brushes. Little stars with names were added and they were planted on the table at each setting.

 I gave the needles a little trim around the top so that they had a more tree-like shape and would look less like bottle brushes. Little stars with names were added and they were planted on the table at each setting.
Sunday, 31 October 2010
squeal!!! it's a squash!
well last year my little pumpkin was super-friendly...this year i felt we needed to go a bit more scary! Unfortunately this one was not grown by me...my pumpkins didn't last until Hallowe'en this year!!
 As ever, it was super-easy to carve and i used the pumpkin flesh from inside to make a batch of pumpkin brownies which were really delicious!!! Check out the recipe, i highly recommend!
 Doesn't he look scary?? I think i do too, in this picture!! Have a good night and watch out for killer pumpkins!!!

 As ever, it was super-easy to carve and i used the pumpkin flesh from inside to make a batch of pumpkin brownies which were really delicious!!! Check out the recipe, i highly recommend!
  Doesn't he look scary?? I think i do too, in this picture!! Have a good night and watch out for killer pumpkins!!!
Friday, 1 October 2010
sequinned sun seats
I'd been looked for patio-chair cushions all summer long, but they were always too plain and too expensive! A horrible combination! I had wanted to make some from scratch myself, but the plain foam is prohibitively expensive!!
Then I saw them...in a pile of "after-summer-reductions" fabulous purple circular cushions!! However, always seeking sparkle wherever i go, i thought they could use an extra little something...
 So I sewed on little pink sequins to give them a more luxury-easterny feel. I can imagine these in a heavily embroidered bedouin tent with silky veils flowing in the breeze....oo i love it, i need one of those!!
Then I saw them...in a pile of "after-summer-reductions" fabulous purple circular cushions!! However, always seeking sparkle wherever i go, i thought they could use an extra little something...
 So I sewed on little pink sequins to give them a more luxury-easterny feel. I can imagine these in a heavily embroidered bedouin tent with silky veils flowing in the breeze....oo i love it, i need one of those!!
Sunday, 22 August 2010
spotty stool
I also got a frame for a little stool and so very simply made a seat (well reinforced of course!!) from some more ikea fabric. This one will be used to hold the box of buns from which i will be feeding my face over the weekend...yay holidays!!
 ...or else it will be holding the box of threads for my cross-stitch!! lol! either way it will be used for festive holiday purposes!!
 ...or else it will be holding the box of threads for my cross-stitch!! lol! either way it will be used for festive holiday purposes!!
deckchair makeover
So..still on the subject of camping (come on the weekend!!) I acquired a pair of these from my mamma's garage clear-out.
 A bit of measuring and stitching with some of my left-over ikea upholstery weight fabric...
 ...and da-daa!! Good as new deckchairs for brightening up our camping space!
 I didn't have enough of any material to make two the same...but it's probably better that way with a bit of mix-and-match!
 There really isn't much of a pattern...i basically just bound the edges of the heavy fabric with bias binding and reinforced the seams four times at each point to be sure that they are not going to snap and deposit the unfortunate sitter on the grass! (That still might happen!...i will report back if it does!!)

 A bit of measuring and stitching with some of my left-over ikea upholstery weight fabric...
 ...and da-daa!! Good as new deckchairs for brightening up our camping space!
 I didn't have enough of any material to make two the same...but it's probably better that way with a bit of mix-and-match!
 There really isn't much of a pattern...i basically just bound the edges of the heavy fabric with bias binding and reinforced the seams four times at each point to be sure that they are not going to snap and deposit the unfortunate sitter on the grass! (That still might happen!...i will report back if it does!!)
Friday, 25 June 2010
chalky bubbles!!
Now what to do with all this chalk-board paint??!!
I thought we could make a photo-opportunity point where we could write messages and get our picture taken with the speech-bubbles expressing our thoughts. Hopefully it's sunny at the BBQ this weekend and i'll get some cool photos of all my family and the deep and burning things that they are dying to say!!
 Same as the blue-board i just got mdf cut into the right shape and painted them up with chalkboard paint, before adding a dashed line of white gloss for decoration.
I thought we could make a photo-opportunity point where we could write messages and get our picture taken with the speech-bubbles expressing our thoughts. Hopefully it's sunny at the BBQ this weekend and i'll get some cool photos of all my family and the deep and burning things that they are dying to say!!
 Same as the blue-board i just got mdf cut into the right shape and painted them up with chalkboard paint, before adding a dashed line of white gloss for decoration.
 Thursday, 24 June 2010
belated blue-board
Yay!! At long last SuperD's hand was healed sufficiently to complete the little task that i've been nagging (every waking moment) about!!! My garden blue-board is ready!! So now i can write happy messages and let the rain wash them away.
 I used chalkboard paint and was initially going for the standard black but there was none left...so settled for cobalt blue (SuperD's favourite colour) to make it a bit more personal and also a bit more obvious what you are supposed to do with it...i stencilled our little faces and dashed line around the edge.
 Now i'm all set for my big birthday BBQ extravaganza at the weekend, when this will be used for the cocktail menu and birthday wishes of course!!
 I used chalkboard paint and was initially going for the standard black but there was none left...so settled for cobalt blue (SuperD's favourite colour) to make it a bit more personal and also a bit more obvious what you are supposed to do with it...i stencilled our little faces and dashed line around the edge.
 Now i'm all set for my big birthday BBQ extravaganza at the weekend, when this will be used for the cocktail menu and birthday wishes of course!!
Thursday, 20 May 2010
fence on fire...
o no wait...more like fire on fence!! As in the fire of my candles that will brighten up my patio on the still summer evenings, and add atmosphere to our BBQ nights!!
 These were all made with more of the little creme brulee jars (...a moment of silent ecstacy as i remember the taste...mmmmmMMmmm!)
 and i just formed some simple garden wire into a hanger and decoration!
 Mostly garden related...flowers...
 ...leaves...
  ...starry nights...
 ..umm...snail shells???
 ...and more flowers!!
 This is the way i placed them, around my (yet-non-existent) garden chalkboard. When SuperD's hand is better he's gonna make me one so i can write welcome messages to my garden guests!!!
 ...i can't wait!
 These were all made with more of the little creme brulee jars (...a moment of silent ecstacy as i remember the taste...mmmmmMMmmm!)
 and i just formed some simple garden wire into a hanger and decoration!
 Mostly garden related...flowers...
 ...leaves...
  ...starry nights...
 ..umm...snail shells???
 ...and more flowers!!
 This is the way i placed them, around my (yet-non-existent) garden chalkboard. When SuperD's hand is better he's gonna make me one so i can write welcome messages to my garden guests!!!
 ...i can't wait!
Monday, 17 May 2010
bath & buffet for birdies!
I've always loved teacups and so when i saw them made up as bird-feeders and bird-bath in one....i just had to have one!! There are lots of these online, but this is the best tutorial i found.
 I had the pole and the fixture just lying in the shed, dying for a purpose so i simply stuck the fixture on the bottom of the saucer with super-glue, then perched the teacup on the saucer and glued in place...then placed a cheap teaspoon (6 for 99p - score!) on the saucer, sticking out making a little perch for the bird to stand on!
 Then just filled the cup with water for bathing-birdies, filled the saucer with oats and lentils (note to self...buy real bird food!!) and perched it on the pole!
 I'm not around much of the day but if i manage to get a snap of a little bird availing of the bath or buffet i will upload it here!!
 I had the pole and the fixture just lying in the shed, dying for a purpose so i simply stuck the fixture on the bottom of the saucer with super-glue, then perched the teacup on the saucer and glued in place...then placed a cheap teaspoon (6 for 99p - score!) on the saucer, sticking out making a little perch for the bird to stand on!
 Then just filled the cup with water for bathing-birdies, filled the saucer with oats and lentils (note to self...buy real bird food!!) and perched it on the pole!
 I'm not around much of the day but if i manage to get a snap of a little bird availing of the bath or buffet i will upload it here!!
 Tuesday, 11 May 2010
a shed-shelf!
So i had run out of space for window boxes and plant pots on the patio and windowsills out the back of my house...enter Super D with saw in hand. "D quick i've a little mini window-box that i want to put on the shed...between all the spiderwebs!!"
 I need a shelf...stat! Nice!...I like it! Fits perfectly!
Friday, 30 April 2010
goodie guards!
With the BBQ season coming up I'm turning my mind to eating outside and getting my picnic stuff organised!! One thing I don't have is something to put over the food on the outside table... you know to stop the bugs from munching before we get to. What i do have is a lot of ivory gauze from a curtain that I made for a friend's wedding a while ago...so i picked up some wire (plain garden wire worked best, being cheap, strong but malleable)  The round one was a bit awkward to get even. It's made from 5 panels each the same size. I hemmed them together and then bent the wire to fit. I added stitches along the seams securing the wire in place and thereby reinforcing the structure. The bottom seam was then bent under and a single line of zig-zag all round the base...easy peasy!
  The square was infinitely easier as there is only 4 panels and there's no need to secure a loose wire at the apex....it's just two long wires diagonally secured at opposite corners. Add a little circle of colour-coordinated suede at the top to hide the join and add a little tag for lifting.
  ...and that's me BBQ ready!!!
 The round one was a bit awkward to get even. It's made from 5 panels each the same size. I hemmed them together and then bent the wire to fit. I added stitches along the seams securing the wire in place and thereby reinforcing the structure. The bottom seam was then bent under and a single line of zig-zag all round the base...easy peasy!
  The square was infinitely easier as there is only 4 panels and there's no need to secure a loose wire at the apex....it's just two long wires diagonally secured at opposite corners. Add a little circle of colour-coordinated suede at the top to hide the join and add a little tag for lifting.
  ...and that's me BBQ ready!!!
Monday, 12 April 2010
sign-posted seedlings
A fun thing about this time of year is getting all the little veggies up and running! We are "seedling-central" in houseofspoon! Something that happens to me every year is that i have a mystery pot...that is one that i don't remember what's supposed to be growing! So I thought i'd get my salt-dough obsession on the case!!
 now all my little babies have signposts explaining what i can hope to be eating very soon!!! Yes...there are millions of chillis!!!
 Got carried away and started making fancy ones!!!
 "C'mon pepper...the label is dwarfing you...get a spurt on!!!"
 Now just have to make labels for the pumpkins, the onions, the shallots, the lettuce, pak choi and my favourite...rocket!!!
 now all my little babies have signposts explaining what i can hope to be eating very soon!!! Yes...there are millions of chillis!!!
 Got carried away and started making fancy ones!!!
 "C'mon pepper...the label is dwarfing you...get a spurt on!!!"
 Now just have to make labels for the pumpkins, the onions, the shallots, the lettuce, pak choi and my favourite...rocket!!!
Subscribe to:
Posts (Atom)


