Tuesday 31 July 2012

Rainbow vestments!

At the same time as the new muslins, i dyed some vests....as before, the colours washed up very bright and girly, so they're not going to be able to be used for my boy!!  I'll have to just find a baby girl to give them to...one that like tie-dye of course!  I have to say though...i love the random-ness of the pattern and the coverage...now if only i'd any more masculine dye colours left.....

Colourful Calendar

So with all the appointments and visits that i've been having for the baby, i've needed to start a week planner on my magnetic notice-board.   So just to brighten it up a bit, i made magnetic days of the week and dates. 
They are just stamped on fabric with fabric paint and then stretched around a cardboard template with a little bit of padding.  Made in the same way as the previous magnets.  
All i need to do is switch the dates each week and mark in the appointments in wipe-able marker below them...easy!

Monday 30 July 2012

How many arms?

So i have to admit that i've always enjoyed changing the baby, but it's getting steadily more difficult the older he gets.  He can now roll over and needs to be pinned down or he'll be away across the carpet with no nappy on...eeek!! danger!!  But one of the most difficult things is trying to change his clothes!  He is quite literally ALL arms and legs.  No sooner have i got one foot through or one hand through and there's another one pushing through the same hole, or the other side is out and flailing in the air...aaahh!!
So the motif i chose for this vest is particularly suitable for him!!  The vests were dyed as usual...it's a little hard to see but i used blue and green dyes and they made a lovely variegated effect. 

Sunday 29 July 2012

Muslin mistake!

So i needed another set of muslins (it's teething time!) and i wanted to do rainbow spiral tie-dye.  It's pretty easy...it's just a matter of laying out the material and then sticking a paintbrush on pencil or something in the middle and winding to make a little coiled pancake.  Then secure with elastic bands (i used thread).  Then it's just a matter of applying each dye to a quarter of the pancake.   

Easy peasy right?  See those gorgeous rainbows below?...I learned something painful with this craft...dont try to keep already-made-up cold water dye, it's not stable and it doesn't keep.  These beautiful rainbows below washed away to a dingy grey - imagine my disappointment when i opened the washing machine to pull them out!!!
So i was so angry that there was nothing to do but repeat the whole process the next night with the dingy grey muslins and some newly-made-up dye.  Only problem was, I didn't have any blue left...only a pale purple.  I was thinking is purple too girly for a boy??....well i needn't have worried, it didn't stay purple.....the red washed out to cerise pink (my fault, i didn't make it strong enough) and the purple washed out to pale pink.......talk about girly???  Needless to say, i refuse to waste them and will be using them for my boy just the same! lol!


Nikolai Nutcracker

So i had always wanted to make a nutcracker (i love them in case you hadn't noticed) out of fabric and thought that it should be really easy to use the paper piecing method for hand sewing.  So i made a paper version first and then cut it up to make a pattern.  
 
Isn't he hilarious?  He looks a bit sad though..or maybe nervous!  It's the down-turned eyes i think.  (i actually have only just noticed that i haven't given him a nose!! ooops!!) His hat is also a little askew at the top.  I have since put a plastic disk cut of acetate sheet in there to make it nice and flat.  
Attaching the hair and beard were my least favourite thing...they needed to be trimmed so there was fluff EVERYWHERE!!
I did some freemotion embroidery on the jacket and boots just to add detail.  
I also make the belt tight so it would give him a waist...but everytime i let go....he breathes out, sticks out his belly and it goes back to this!!! 
I'm not 100% happy with him...i think he'd be cuter if he was shorter and fatter...but he's good for a first go.  If you fancy making one too you can find the pattern here.  


Saturday 28 July 2012

Baby's 1st Board Book

Board books are cool and i wanted to make sure that Rocchino gets to read some of them in italian too.  After a quick search online i decided that the prices were prohibitive, not to mention the postage, so i thought i'd use the opportunity to my craft advantage.
I drew some dodgy cartoons of our family onto pieces of mountboard, the stuff picture-framers would use...i've since decided that a thick card would have done...the mountboard is lovely and thick but doesn't fold without breaking so i had to reinforce all the folds with tape and glue.  Anyway, i coloured the cartoons with pencils for a soft colour look and then covered the pages in adhesive cellophane to protect them.  

Now cue very expressive voice...
My name is Rocco...here I am!
This is my daddy...here he is!
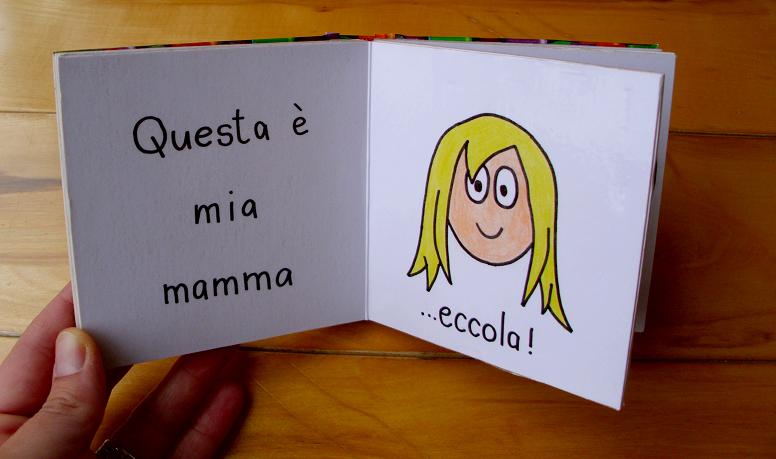
This is my mummy...here she is!
These are my irish grandparents...here they are!
This is my cousin Daniel...here we are!
Allllll Done!

pebble-patterned carpet protector

Having made my nappy bag and made it huge...it is absolutely perfect for these early days when i'm carrying everything around with me for the baby...however, it's not so great when im heading out for the day and need to carry with me only the essentials.  So my sister-in-law bought me a little travel changing bag for just such moments and while it is perfect...the changing mat is decidedly white and boring....you see where i'm going with this.

Enter mini travel changing mat.  I made it the same way as the larger version, but this time used a pebble-patterned table protector. 
 
It is silly of course but i hesitate every time before plonking him down onto it because it looks so hard and uncomfortable - all that cold hard stone!!lol!

Hospital sewing mark 3

So following on from the little dolls i sewed in hospital when i was in for the birth...this time when i was back in with Rocco for his operation, I brought another kit with me!  These are so easy and quick!!  I think i'll have to design some little customised ones and make up the kit myself - wouldn't that make a fun present for a crafty person??

Baby's 1st uniform!

So my bambino has enrolled in the best creche in the country while i'm at work...yep, Grandma's house!! He and his big cousin (who is a whole 6 months older - oh!!) are the sole pupils and are spoilt rotten all day long, no doubt!
So i decided to make him a little uniform, with the Grandma's Creche crest on it of course!  To make the crest i used freezer paper then fabric paint....it has the 4 most important things that make it Grandma's Creche...heart for much love, stars for lots of fun, z's for naps and a banana...well...because...you need to know my mum really!  She believes that bananas cure all ills. 
Then free-motion script at the bottom...easy-peasy!

cardboard cakeplate

So i decided to take a blog holiday in June because Rocco was in hospital getting his first big operation, and I didn't really have the time or opportunity to post crafts. And while July has been spent doing lots of crafts...there has not been a lot of blogging time, hence the late posting!!
This is just a quick one for parties - it's a cardboard bun-stand.  It is just 3 circles of thick cardboard, covered with patterned adhesive paper. 
To assemble, you just slot the two pieces of the stand together and slip the circles over one by one....then twist them round to secure and keep the stand in the correct position...make sense?