Showing posts with label paper. Show all posts

Saturday, 28 July 2012

Baby's 1st Board Book

Board books are cool and i wanted to make sure that Rocchino gets to read some of them in italian too.  After a quick search online i decided that the prices were prohibitive, not to mention the postage, so i thought i'd use the opportunity to my craft advantage.
I drew some dodgy cartoons of our family onto pieces of mountboard, the stuff picture-framers would use...i've since decided that a thick card would have done...the mountboard is lovely and thick but doesn't fold without breaking so i had to reinforce all the folds with tape and glue.  Anyway, i coloured the cartoons with pencils for a soft colour look and then covered the pages in adhesive cellophane to protect them.  

Now cue very expressive voice...
My name is Rocco...here I am!
This is my daddy...here he is!
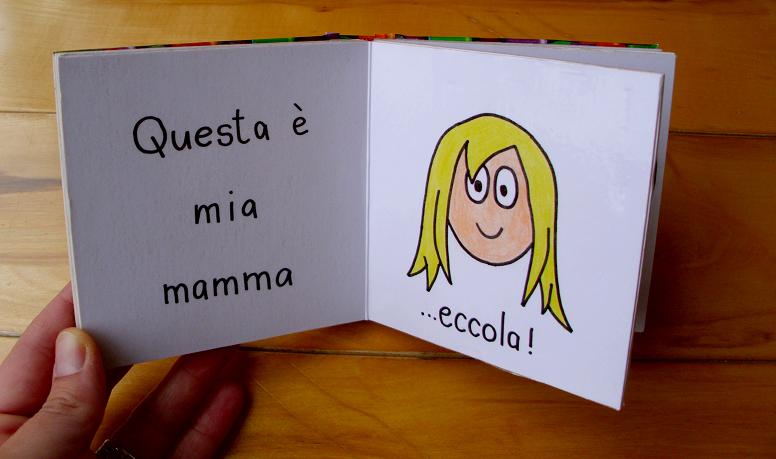
This is my mummy...here she is!
These are my irish grandparents...here they are!
This is my cousin Daniel...here we are!
Allllll Done!

cardboard cakeplate

So i decided to take a blog holiday in June because Rocco was in hospital getting his first big operation, and I didn't really have the time or opportunity to post crafts. And while July has been spent doing lots of crafts...there has not been a lot of blogging time, hence the late posting!!
This is just a quick one for parties - it's a cardboard bun-stand.  It is just 3 circles of thick cardboard, covered with patterned adhesive paper. 
To assemble, you just slot the two pieces of the stand together and slip the circles over one by one....then twist them round to secure and keep the stand in the correct position...make sense?

Sunday, 18 December 2011

Giant Christmas Card II

So i was asked to do the church's communal christmas card again this year, after having made the gold and black one for last year. This year, not having a lot of time, i decided to go with a very simplistic design on mirrored silver card.
I cut out all the little pieces from black card with a craft knife and glued them on - easy peasy!
Again it's hard to see the size of the card without a bit of perspective so i've stuck my boot into this picture so you can see the sheer size of the card. Lots of space for all the people to sign their names and greetings!

Monday, 21 November 2011

magic card box

So the box itself isn't magic...but the cards that Joster plays are called Magic the Gathering. He has 1000s of the cards and little boxes and cases for them all, but in the latest "expansion", as i believe it is called, there were some special edition large cards that didn't fit his little boxes. So i sensed a project and volunteered to come up with something to store them in.
I made the case all in one piece and then slipped in reinforcing bits of cardboard to fit each little section. Seams kept the pieces from moving around and then the whole box is folded up into shape and hand-stitched into place. Makes it sturday and means there are no rough edges to be seen anywhere.
I put flat magnets under the fabric so that it snaps closed...you can't see them in this picture...you'll just have to trust me that they're there!! And look, the cards fit perfectly...job done!

Monday, 31 October 2011

dire decoration pics!

I totally forgot to take photos of the little hanging decorations that i made for the halloween party (taking pictures of crafts is my least favourite part - i can never be bothered setting up the pics properly) so basically i don't have any decent pics of the many bats, pumpkins, black cats and other creepy things that i cut out and painted black and gold and strung everywhere around the house.

I strung up little garlands of orange and black pompoms as well just to tie in the halloween-y colours.
You can just about see them in this pic - sorry it's so hopeless, but you get the idea!!

Tuesday, 31 May 2011

invite in a bottle

So the last weddingy post i'm going to do is just squeaking in on the last day of May (ahem - cheating notwithstanding) The invites were the first glimpse the guests were going to see of the wedding-theme. I made up little glass bottles (about 5" high - bought online) adding some sand in the bottom from Brown's Bay, the beach near my house, and some little shells - one simple white "cockleshell" from The Cove (a different beach down the street from me...in ireland there's almost always a beach down the street!!) and a tropical shell bought off the internet.

The name tag was just written on rough recycled card and tied on with string.
So that the invite could be accessed easily without sand-spillage i put a drawing pin through the ribbon and into the base of the cork. Easy as that.
It was definitely more fun to have the guests have to open and unroll their invite rather than just open the envelope. We sent some of the bottles to SuperD's family in Italy...must have been quite strange to open a package and find a message in a bottle!
And i had some bottles left over, so we used them in the table-centre beach-rock-garden things and also on the cake. I printed out little bible verses and opened them up inside.
Cute!

Friday, 29 April 2011

plant labels

we're having a competition in work to see who can grow the most and biggest chillis this season. We've all chosen different varieties and currently they're all relaxing in my greenhouse until they're mature enough to make the trip into work with me.
A super-simple paper craft to make little name badges for each of the contenders...this one's mine "Come on hungarian hot wax!!! Mamma's hungry!"
One of the varieties is razamatazz and it produces purple chillis! cool huh?
The winner (or should that be loser?) has to make food for the rest of us using their chillis...i can hardly wait! yummy!

Pamela's posit-it holder

Another craft that Pamela suggested was this quick but effective little book cover. Using lots of cool paper pieces and cutters from her stash i threw together this little springy-themed card. See her little quilling flower, she cuts slits in a quilling strip and then rolls it up before splaying at the little petal pieces - good idea isn't it?
And it's put to good use holding the crucial memory aid that is the block of post-its (Post-its are stuck all over my life - seriously, they're everywhere!)
Thanks Pamela!

Thursday, 28 April 2011

easter egg basket

Easter crafts of course are on the go at present (or they were last week if i had managed to photograph them in time). This is a really easy paper craft taught to me by the fabulous Pamela who makes lots of great creations: cards, quilts and paintings to name but a few.

Take a square of card (5.5"x5.5"), clip the corners and score fold lines as shown in the pic below. Make 4 cuts to reach the edges of the centre square as shown. Cut yourself a nice long handle piece.
Then fold in the corners like this...and secure with a staple when you're happy with the shape, catching the edges of your handle.
See? Like that. Feel free to decorate as you go!
Then quickly fill with Lindt mini eggs and run like the wind to hide them in your sewing room to give much needed sustenance during those long crafting marathons!

Thursday, 31 March 2011

rubber bubble

Another useful stamp i thought i could use was the speech bubble! I also made a little hi! stamp so that the little matryoshkas could speak and show how friendly they are. And not only the matryoshkas...the mushroom also had something to say...
The main use i find for the stamps is in personalising napkins for dinner parties etc...so easy!

mix and match matryoshka

So having made a rubber matryoshka in one colour out of the plastic erasers, I had said that i wanted to bring a bit of colour to the stamp. I made one with a "hollow" tummy and carved a mini flower to fit inside, and then carved another in two parts allowing me to mix up the colours of the top and bottom. Quick, easy and great fun!
I'm hoping to get into lino printing next so that i can make larger stamps and customise some material...i've a pair of shorts in mind that would work well with a mad fabric.

Monday, 28 February 2011

rubber matryoshka

Just a little quickie....a hand-carved rubber stamp made from simple plastic eraser.
I think i'll make a bigger one...but in different pieces so that i can use more than one colour.....hmmmmm...

Monday, 27 December 2010

spikey rubber stamp

ooops! i had totally forgotten about stamping my napkins and so when i remembered on christmas eve night, i realised that i had no new stamps to use. So i packed some supplies and spent 5mins or so at poog's christmas party sitting in the corner carving out these stamps.
Great..i love rubber stamps they are so quick and forgiving!!

Tuesday, 30 November 2010

Giant Christmas Card

So i was asked to make the Christmas Card for our church...yep just one card for the whole church...which means it needs to be BIG!! I had to make it on A1 card!!!

I thought layering paper would be the best look, rather than to try and paint directly onto the card. The design was copied from a card i saw online that i thought would suit layering. I just drew all the pieces free-hand and layered lots of different colours and types of paper. The star and the sand are super-glittery, unfortunately the light in the photo isn't great for showing them up.
Inside i put a verse from Luke 2, but left lots of space for people to sign their names! It means that all the church members don't need to buy each other christmas cards!
It's hard to know what size it is so i've stuck my foot (complete with snow-boot!) inside this photo to give you a bit of perspective!!
cool huh?

Tuesday, 21 September 2010

cotton anniversary craft

So it was our 2nd wedding anniversary recently, the cotton anniversary. We had a party and everyone had to bring cotton presents...it was great fun!

The place-names were little pieces of cream cotton and gingham pegged to the glasses with mini clothes pegs.
I had a lot of trouble thinking of cotton party favours because i didn't have time to start sewing something for every one of the guests...but finally i came up with the perfect thing!!! TOWEL CUPCAKES!!! lol it was so much fun to make them!! I made large bun-cases from red card and rolled up two facecloths to make a chocolate and vanilla cupcake.
I made little labels with "two" on them and also stamped up the napkins with homemade rubber stamps, just to remind everyone of the phenomenally long time that we've been living together in houseofspoon!!
Here's to many more happy years!!!

Thursday, 26 August 2010

camping stamping

Guess where i'm going this weekend???!!! Yep! you guessed it the blessed day has arrived! Everybody is getting packed up and on the road...soo exciting!Stamps made as usual from simple pencil eraser cut out with a craft knife. I've been looking forward to this trip since i came home from the last one in July! So much so that we even had a holiday themed dinner to celebrate!! So i got to use my stamps on the napkins!!...these are a couple i came upon when clearing up the party...made me smile again...yay holidays!!

Saturday, 31 July 2010

stamp it out!

To break up the dressmaking sequence i wanted to post another wee quick craft that i'm also doing at the minute. I make the little stamps out of normal rubbers (erasers for the US peeps!) and just draw the design (IN REVERSE!) on the rubber in normal pen and then cut away all the white areas with a normal craft knife, or sharp kitchen knife.

It's surprising how accurate you can be! The rubber is very soft so the finished stamps can be easily damaged,but if you look after them they will last indefinitely.
I use mine for making designs on fabric or for stamping personalised napkins for special parties. I've also made quite a few for giving away as wee pressies.

Saturday, 19 June 2010

packed with pertinent promises

I have been been thinking a lot lately of a way in which i can keep a record of the many answered prayers that have been blessing my life. Somewhere that i can record the problems that I am praying about, and then to record the answer and the subsequent resolution of the issue.
As a christian God leads me in decision making and in showing me what i should (and shouldn't!) do in every situation. It's really encouraging to glance back over the many times when the situation was impossible, and He told me that it would be resolved, and showed me what the end would be, and asked me to believe it...only for the impossible to occur and his words be proved right!!! Every time a miracle, and every time a surprise!!
I choose little business cards and punched them for hanging on a hinged ring so i can add extra pages when it fills up...which no doubt it will!!! I cut the corner off the "problem" pages, so i can find them easily from the other "verse and promise" pages. I covered a stack of the cards with material for the back and front covers and lined them in pale pink. Now next time my faith in God's deliverance from a sticky situation is waning, i'll have some home-truths to read from my own experiences!!!!

Friday, 26 March 2010

cartoon cup club craft

so i was asked to do a craft night for my church's youth club. Think über-hyperactive early teen boys and a couple of girls as well.....yikes!!! Well i wasn't too distraught because i remembered that i brought a sewing craft to the club at christmas for the girls and it was all the boys who demanded to do it!! And a good job they made of it too!!

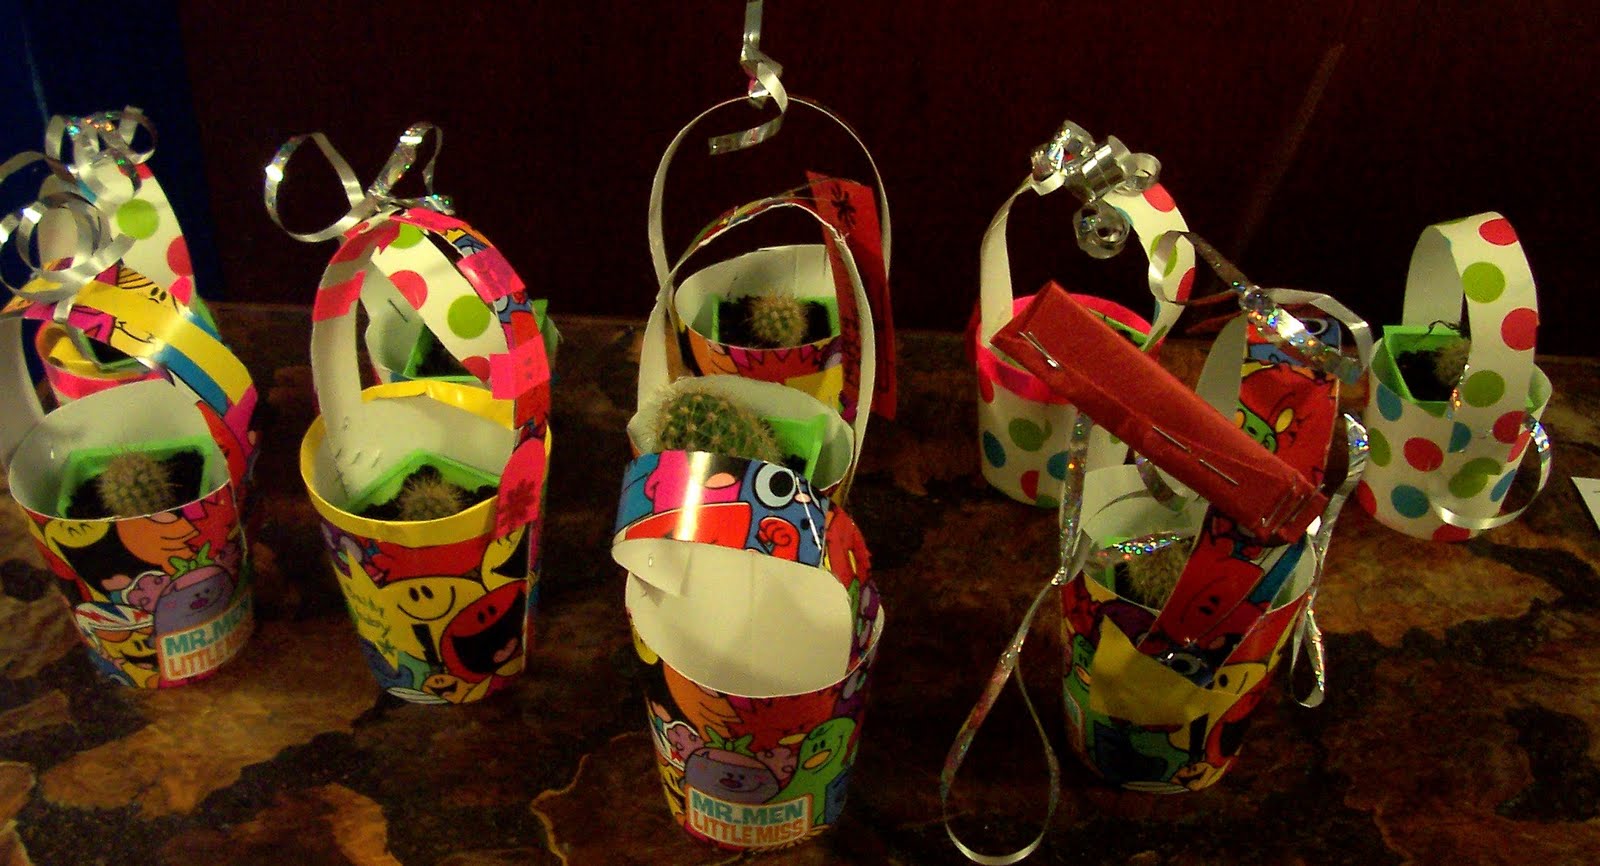
So it had to be Easter-y and also Spring-y...and easy to do for the non crafty peeps. So i decided on Easter baskets with a baby plant inside.

This fitted the bill because it was inexpensive (i'm thrifty, as in cheap , i should mention that) as it was made from paper cups, and it also solved my problem of the burgeoning cactus population at houseofspoon....i would hate to bin the new babies...but really i'm coming down with cactii!!
Loved these comic book style cups..they really made it!!
And here are some of the club's creations...they were at it for ages!!!

...and only had 1 stapler fight and only 3 were injured!! What a result!! (no really..that's pretty impressive, trust me!)

they really enjoyed it and that's the main thing!!!
Happy Easter!!!!