Thursday 30 April 2009

the CLASS slipper!

O look! Some rainbow princess has left a fabulously crafted slipper on the step of the palace of spoon... where can she be?...and why did she leave in such a hurry??
Prince Super D (he will kill me for that) searched high and low across the land to find the fantabulously styled and impossibly beautiful rainbow princess to whom the slipper belonged. While travelling on the remote and verdant island of Magee he found a spoon, who fitted the above description perfectly, and had a chilly right foot. In a magical, sparkly and musical moment Prince Super D gently attempted to try the slipper on the spoon before she pushed him out of the way saying: "o just give it to me, i'll do it myself.....and where's that hideous music coming from?.....ooo sparkles!!!"
So anyway it fitted perfectly and spoon explained that she had left the palace in a mad panic because one of the ugly sisters (sorry poog...but it fits the story!) had arrived and they had both realised that today was the last day that the legendary local icecream parlour would be serving "cadbury's creme egg icecream" as the flavour of the month, and it was getting pretty near closing time...hence the speed of departure.
THE END
...
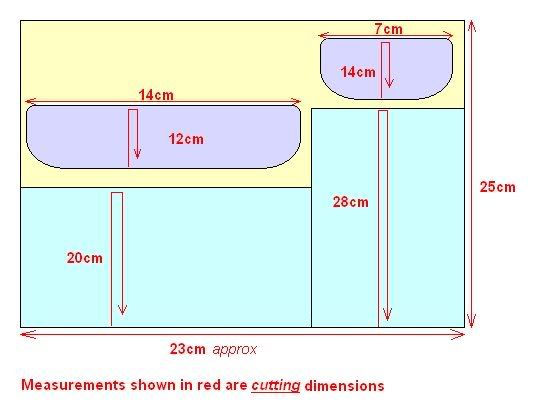
Anyway....since we have soooo many hard wood/stone floors in the house of spoon(& SuperD)... i am a big fan of slippers! But i've looked into making shoes before and if you want them to look close to wearable there are quite a few tools you need to acquire....and since craft (to me anyway...hello poog!) is about using materials and stuff that you already have and putting them to better use, i really lost interest in the concept. (Note: I'll buy new supplies for a project but only if i know they could be used for other stuff too!)
So when i saw this slipper tutorial that looked really easy, i was very excited to try it!

I actually used "oven glove wadding" as it was all i had, which made the sides a little thicker and infinitely increased the "difficulty factor"....i actually found them quite awkward to make, but aren't they worth it!!!???

I cut the pattern pieces as noted in the tutorial as they were for my foot size but found that the top piece was too short lengthwise to sew to the base, and i had to add an extra piece to extend round the heel. This was easy enough to do but makes it look a wee bit scruffy on the inside of the heel.


I used a piece of blue suede from an upholstery samples book so i won't slip!

it came to my notice (late last night...hence lack of natural light) that i never showed the other one...i did make a pair, i promise!!


Tuesday 28 April 2009

quilt with squares, not wonky rhombi

Well...i went to my first craft class!!
It was a lot of fun and about a mile from my house (which was GREAT! especially because after we had all arrived, chatted, had our coffee and were about to begin...i realised that the zipper foot was on my machine and the normal presser foot had been left on the desk in my craft room at home...d'oh!) a 5 min journey and i was back in business.

It is a class that usually quilts, so it was inevitable that quilting would be used somehow....which is great for me because this is where i am super-weak...no accuracy!!!!

But i am delighted my little bag turned out pretty accurate...apparently my lack of accuracy stems from my very lazy approach to material cutting....ie "o that square is a bit wonky, more like a rhombus...never mind, im sure it'll be fine"....it seems that this is a cardinal sin in real quilting. I look at the three quilts that i have made in the past and a lightbulb goes on!

The little bag is reversible and made up of squares on one side and larger pieces on the other. Interfaced pockets are slipped in when quilting the pieces together.
I really should get round to sewing with some other material...if it wasn't so expensive that is!

Thursday 23 April 2009

Welcome - Wee Spoon and SuperD!

Haha! I have to say this was one of the most fun projects EVER!! It seems that i can't help myself...SuperD has such distinctive features that it is brilliant fun to create little SuperDs in every medium i have to hand!!!


...And as long as there's a blondie in bright colours beside him, you'll always know it's me!!


Wee Spoon and SuperD have gone for a big scary hike through the (neglected) forest and saw many strange giant purple-pompom trees and wildflower bushes. They climbed up onto the highest rocks that their chubby little stuffing-filled legs would allow and posed for some pictures.
I made up the pattern as I went along, which is easy because crochet is a very forgiving medium. The bodies were crocheted from the neck down and the heads were made separately and then joined. The little bodies were filled tightly with toy stuffing and love!

For the hair I began by crocheting little "nets" which fitted neatly over the heads and then attached the loose fibres to the stitches of the net (using latch-hook rug making method...just with the crochet hook), then the whole hair piece can be sewn onto the head in one go.

Do you think SuperD needs a decal on his little hoodie or is it better plain?


"Guys come on, these poses are pretty boring....do something fun....yes that's right, have a little whisper and then...


Haha that's much better!!!


Dear Wee Spoon and SuperD,

I hope you have as much fun as we do!


Love,

Regular Spoon and SuperD


Ps Wee SuperD is going red....Wee Spoon, you better get off him before you break his back (See? We're not that different after all!!!)


Thursday 16 April 2009

wrap up in a rainbow!

Well my heart was deeply touched by all the pics of poor lil'pill among the snow of icy germany so i decided to make her a scarf worthy of someone with her Ravebabe/Rob-bob background...ie it had to attract attention.
...
So inspired by this post on crafty crafty i began to crochet this little winter warmer:

(sorry the pic is pretty poor! The scarf is much longer but i let it hang down at the back so that it sat nicely for the photo!) The scarf was worked in rows of double crochet and the clouds are 5 circles worked in single crochet and then sewn together into roughly cloudy-type-shapes.

Only problem is....now that i've finished it she has started posting pics of herself cruising around in riverboats blistering in the sun!!!.....

hmm....so do i send it anyway, or start working on a bikini version?? lol

Monday 6 April 2009

have tools wrap...will travel!

Ahhhhh!!!
If I lose another wool needle I think I will scream. I seem to have kept the wool-needle-producers in business over the years by successively losing every single new one that I purchase (and also a couple of those that my mum has purchased…but don’t tell her…I don’t think she has noticed!) Basically I’m lucky if I manage to keep the same one for the entirety of a project. The same goes for sewing scissors and crocket hooks. Time for something to be done…seriously, I can’t keep myself in crochet tools!!!!

There are a lot of crochet rolls online, but I didn’t see one that would fit my rather motley collection of oddly shaped tools. (Note: The bunny-stick is a cocktail stirrer that I use to turn pieces right-side-out because it has a rounded ball tip so I don’t puncture the material…i do realise how sad this is, that I use a cocktail stirrer for nerdy craft purposes…groan)

The measurements in the list below are those I used, you may wish to tailor to fit your tools! You may wish to keep all your “tools” on one level, but some of my tools were much bigger and I preferred to make two levels.

Cut 1:
Inner lining - blue cotton 25cm x 23cm
Outer material - flower pattern cotton 25cm x 23cm
Interfacing - 25cm x 23cm
Tall pocket - flower pattern cotton 28cm x 14cm
Short pocket - flower pattern cotton 20cm x 19cm
Tall pocket flap - blue gingham cotton 14cm x 7cm
Short pocket flap - blue gingham cotton 14cm x 12cm
Needle holder -
white stiff aida (small piece)
Stitch marker holder - white stiff aida (small piece)

Bias binding
Elastic for closure (or use a button and cord OR 2 cords for tying if you prefer)

Instructions

I recommend cutting the inner lining piece a little bit longer than required, as you will be working from the left-hand-side and you can just trim at the right-hand-side when you are sure you have enough room. See basic outline below or click here
1. Fold the short pocket piece in half lengthwise and iron the fold. Sew the piece of aida to the pocket fabric for holding the needles. Position the pocket at the bottom right of the lining piece and sew the left vertical seam. It’s not necessary to fold under a seam allowance because we will be “bias binding” the edges.
2. I sewed the bottom horizontal seam of the pocket along the part where I am putting the finer crochet hooks, and stopped before the little pouch where I intend to put my scissors as this will require a little “tucking” of the pocket fabric, so that the lining piece will remain flat.

3. Insert all the tools and pin where the separating seams should go. Tuck under a 1cm seam allowance at the right-hand-side of the pocket. Now sew all the separating seams and the vertical seam at the right-hand-side. It will now be easy to make little tucks in the base of the scissors pouch. Pin these in place and sew along the remaining part of the short pocket bottom seam.

4. Fold the tall pocket piece in half lengthwise and iron the fold. Fold under a 1cm seam allowance at the left-hand side and sew the vertical seam in place immediately beside the end seam of the short pocket. Follow the same steps for dividing the pocket and making the tucked pockets where necessary. Sew the right-hand vertical seam to the lining and trim the lining 1cm beyond this seam (no need for seam allowance in the pocket fabric as we will be binding it).

5. Fold the short pocket flap in half and iron (to give shape 14cm x 6cm) and do same to tall pocket flap (to give shape 7cm x 7cm). Round off the two corners (further-est from the fold) and sew bias binding around the open edge. Now populate your tool wrap with the tools and pin the pocket flaps to the lining fabric, where they will best prevent the individual pieces from flying out when the roll is upside-down! Sew in place.

6. Sew the other piece of aida, for holding the stitch markers, into the gap. Add any decoration you wish into the remaining space.
7. Now iron the piece of interfacing to the outer fabric and place the outer and inner fabric pieces together (wrong-sides-facing). Now sew around the whole thing.
Sew bias binding around the entire wrap. I cut two little pieces of elastic and tucked the edges into the bias binding while sewing around, as a closure, but you can use a button and cord, or even two ties for a simple bow closure.

And it’s done! And I haven’t lost a wool needle since!! (granted it has only been 2 days…but I’m pretty excited about that record!)


Have (organised) tools…will travel!


Wednesday 1 April 2009

panda eyes!

haha i love these little hint pictures...what other creature have i been making in crochet i wonder...

ok..i'll zoom out a bit....hmm...does his bum look big in this picture??


o dear, i think that might have offended him...........look at those eyes! I'm sorry little panda i didn't mean it, don't worry, your new mummy gilpil will just love it i promise!!


panda?...................panda?....................hello?

is there a bamboo plant behind me or has he just fallen into a trance?......panda?.....paaaaaaanda?....hey panda!................................wow


Moral of the story: never try to stare out a panda....you will lose.

rainbow brite!

ok now, hands up who loves rainbows!...........guess what?...me too!!

I also love putting rainbows on everything! This is a rainbow patch-worked bag that i made a while ago with some black corduroy that i had left over from a pair of black flares that i made back in the uni days (which i trimmed with rough black fur....how i loved those trousers!!)


Anyway, it turned out a really good size for a holiday bag and since most of my holiday clothes seem to be of the "rainbow variety" it always matches well too!!


the world is my curtain hook!

Having completed the bug-barrier to get in the way of bugs trying to get into my house, i discovered another related problem....it also did a good job of getting in the way of SuperDs trying to leave the house.....and as he is usually laden with tools etc he ends up sortof twirling and straining to untangle all the beads that wrap round him.....what i'm saying is, it is only a matter of time before he starts snapping the threads, or pulling the whole thing down....a solution was needed!!!


We decided to make "studs" or "hooks" for the wall, to gather the curtain behind when there was likely to be a period of heavy traffic. SuperD carved hemispherical shapes which were so dull that he gave to me for "pimping"


I decided to think BIG and go for the whole world!


I made them using the covered magnet method of gathering the circle at the back face of the hemisphere, making sure the leave a gap in the gathered stitches (off-centre) for the stem to be attached.


I chose two views of earth...can you see little ireland in the first one below??? Hahaha!! it just might not be cut to scale, but it's an important place to me so i don't care!!


And here it is in action!


beaded bug barrier!

ahhhh.....

It's almost springtime "down the island" which means lots of fun things like: getting out in the garden again, starting to cut the grass again, weeding round my flowerbeds, eating breakfast outside in the mornings, planting vegetables, leaving doors and windows open again.....running round like "a girl possessed" flapping tea towels to chase bugs out of the house again....

..........o no wait a minute.......i HATE doing that last thing!!!

Lucky i had a bucket of wooden beads (from a broken car-seat cover of my dad's...very retro dad!) and a craft shop that sells lovely glittery red cording string.

SuperD drilled holes in a piece of wooden edgeing and mounted it above the door, then tied long chains of beads (that i had lovingly crocheted...10 sc then 1 sc round a bead and repeat......believe me that job might be the very essence of BOREDOM)

SuperD (somewhat unaccountably) left a gap in the centre as he considered it would be easier to "split" and tie back if you could see the centre clearly....fair enough.

See the way that it isn't a perfect straight line at the bottom....this is because of the relaxing in the crochet stitches, some are stretching more than others....SuperD is unfazed by this......he's very european......i, on the other hand, flinch everytime i see it......it makes me cRaZy.......but i'm trying to work through it....shudder


But, it really doesn't tangle as much as i worried that it might do, and when it does, it is surprisingly simple to untangle!

wedge of apple anyone?

hmmm.....what on earth is that used for?? (looks dangerous doesn't it!)


well here it is in action...keeping my back door open in the hurricane gales that batter the island, ok that may be exaggerating just a little but believe me, it gets really irritating getting up and opening it over and over again for it just to drift slowly and inevitably closed again!!!


It looks a little bit too short in this pic but it's actually holding wedged against the "lip" of the door that is hidden in the pic.

i like the little finger notches SuperD carved...and what about the little calligraphy D & J on the apple.....lol even our doorstops are customised!!

life is good!