Monday 30 March 2009

it's still furrr-eeezing outside!

so im going to a family wedding on friday in the most beautiful outfit known to man (..believe me, i've done the research!), but i have a small problem as the outfit is strapless, and IT IS STILL FRRREEEZING here.....mild springtime weather where are you???!!!

The outfit is too formal for a cardigan and too much fun for a formal wrap......so then i thought...a mini FUR!!! Only problem is, that it's springtime in the shops (if not outside) and i couldn't get anything for under £90.

...that is, until i made one myself!!!! I used plush black faux fur (cost me about £5) i think and bonded black silky fabric onto the underside. I then just turned over the fur edges and hemmed to the bonded silk piece.


This is a pic of the underside, although obviously it's not supposed to be shown when wearing it!


yippee! i <3 dressing up!!

apron addict?

well after never having worn aprons in the good old days of the motherland, SuperD requested another one after my fabulous superhero one was such a success....it seems he didn't know what he was missing!!!
(...or it could just be that the other one is now so unbelieveably filthy as every saucy spill or splash is instantly wiped with the apron (!!)...it's time i put the kitchen towels within arm's reach)
He even designed this apron himself!! (As in..he told me that he wanted a big cartoon SuperD face on it to let everyone know whose it is...hmm...maybe he is afraid of apron thieves?!)
Well the hilarious chef hat was my idea (obviously) and when I ran in with it on saturday morning where SuperD was doing his daily exercises (bench pressing the guest bed, on this occasion...lol seriously!) he burst out laughing and nearly rookied himself as he was supposed to be stretching!!
hehe it was totally worth it!!

Friday 27 March 2009

welcome to the better weather!

Ok i've decided that it is about time that Spring came to the island so i got SuperD to design and make a little welcome sign to encourage the arrival of the better weather...and other visitors of course!!!
I love the effort he put into sawing out the little veins on the leaves!!
...now all we need is the sunshine....and visiting family to enjoy it with...hint hint!!

Tuesday 24 March 2009

Happy Mama's Day!

Well I just thought i would post the pic of my Mother's Day table just to remind mamma mia that she's loved and appreciated!


SuperD made spezzatino con polenta while i organised the table decor.


Went for a walk afterwards, and i wish i'd brought my camera because it was breathtaking: standing on the headland (cliff-top) at the very edge of ireland, looking out to sea on 3 sides (land on 4th side) and there wasn't a breath of wind, i just wanted to dive down into the water, although we were REALLY high up so i'm pretty glad i didn't try it!


Anyway, thanks for everything mama...you're my wee hero!!!

xxx

Monday 23 March 2009

aaa....aaa...aaAATISSSUE holder

lol...sorry again about the pun-tastic title..hehe i love it

So i had some off-cuts of the peg apron material left over, so made a quick tissue holder also for the little mama for mother's day. There are a million tutorials online for this but just in case you need another one, this is what i did...
..
Cut 1:
- cotton lining fabric 7" x 7"
Cut 2:
- outer fabric 7" x 4" (i did one polka dot and one gingham)
..
Click on this link or on the picture below to see simple visual steps for tissue holder.
..
Instructions
1. Sew the two 7" x 4" pieces together (with 0.5" seam allowance on each) to form a square of 7" x 7".
2. Place this outer fabric piece, right sides together, on top of the lining square and sew right the way around, leaving a little gap for turning.
3. Turn right way out and sew gap closed.
4. Fold 2 edges into the centre (lining fabric outward) and seam at top and bottom edge.
5. Turn right side out and put in your tissues!

I added two lines of ric-rac at step 4, and here it is....

pretty polka-dot peg bag

Well i wasn't sure what to do for mother's day, my mama being a "what did you spend your money on me for? i hate getting new things!!" type-of-person....yeah i know, where did i come from, right??!!

But this means that you're always safe with hand-made (involuntary shudder of delight at the prospect of a new project), and when she mentioned in passing that she really needed a new "peg-bag" (or "clothes pin bag" to mamas across the ocean) i got down to business......

Cut 1:
- base fabric (white with red polka dots) 22" x 14"
- pocket fabric (red cotton) 22" x 8"
- front waist band (red gingham cotton) 22" x 4"
Cut 2:
- pocket band fabric (red gingham cotton) 12" x 3"

- waist ties (red cotton) 22" x 4" (for you these could be longer...my mama is tiny)

You will also need coordinating bias binding and some decoration (i used chunky ric-rac, felt applique and some simple embroidery)

Click on this link or on the picture below to enlarge and read measurements of clothes peg apron.
Instructions
1. Take the 2 pieces of pocket band fabric and sew them together end-to-end with a slightly angled seam so that the mouth of the pocket will dip in the centre in a v-shape.
2. Lay the v-shaped pocket band on the pocket fabric, folding a 1cm seam alloance under and sew at the bottom edge. Cut the pocket material to match the v-shaped band and then bias bind the top edge.
3. Now you can see how much free space you have on the pocket, it's time to add your decoration. I free-hand-embroidered some text and appliqued a little white felt camper van (i added little black buttons for wheels at the end so they didn't get in the way of stitching.) because mamma mia is a lover of all things "camper".
If you do go for hand embroidery it is a good idea to bondaweb some material to the back of the pocket fabric after you've finished stitching, to cover and secure all the threads, as the clothes pegs could catch and pull on this.

4. Now pin the pocket to the base fabric, sew round the three sides of the pocket, rounding off the corners, and do a horizontal inch-long row of stitches on the bias binding in the middle of the v-shape to hold the pocket closed in the centre. This makes it feel like 2 pockets but it is still just one.
5. Bias bind around the 3 sides of the base fabric as shown below.

6. Take the waist ties and sew them end-to-end on either side of the front waist band. With the right side inside, fold in half width-wise to give one long piece. Now at one end, sew the end closed and sew up the waist tie until 1 inch before the gingham section, do the same with the other end. Now turn the two waist ties right-side out and iron them flat.
7. Slide the top edge of the base fabric into the opening in the gingham waistband section and press under a 1cm seam allowance front and back. Sew gingham section closed, securing top edge of base fabric inside.

8. Sew some chunky ric-rac over the waist seam at the front of the apron and you're finished!

9. I don't usually label things that I sew but i felt that this apron needed something else to balance the design, so i fabric stamped a little "house of spoon" label (with simple home-made eraser stamps) and attached it to the pocket band on the right hand side.


And then it really was finished!!!


Thursday 19 March 2009

STAMPEDE!!!

ok i'm going to cheat and post a craft twice...but you see, i have this thing about only posting round numbers of posts per month and since i went crazy and broke the "10" barrier this month...im gonna have to make it to 20 for march!! Now usually that would be a challenge that i would be well up for....but the 3 crafts in which i am currently involved are really taking longer than i thought and are drastically reducing my multi-crafting potential so i can't produce other stuff....eeek!!

Anyway...i want to post something and i emailed mumito with the following pics for her blog but they never made it so i'll post them myself!!


Background story: Copa, gilpil's little porcine pal has been spotted cruising europe in the company of a band of disreputable foreign students, but mumito pointed out that Cabana was MIA. Well i looked into it and heard rumours that Cabana had actually been released into the wild and was acting as presiding bull elephant over a large and overgrown jungle terrain...


My special source was able to acquire the following pics...


then he got a bit closer......

He also alleges that immediately after these photos were snapped, Cabana became aware of the photographer's existence, and with a loud screechy "trumpet" like a leaking balloon he charged the challenger in his territory at full stampede pace...

…however the "grassy plain" that composes his territory, being neglected all winter, is so full of weeds that he slipped in a patch of clover and fell hard on his little short leg (a result of a miscalculation on the part of the knitter). Immediately after this the photographer, all fear forgotten, ran over and picked up the little elefantino, kissed his wee sore leg better and brought him into house-of-spoon for a drink of milk and an amaretto biscuit.

Wednesday 18 March 2009

Can you spot gilpil?..nope me neither

it seemed fitting, since gilpil was posting pics of herself at the real thing, that i post the painting of Neuschwanstein (done by Grandpa) and the somewhat groovy frame that SuperD felt was appropriate to display, what is essentially a miracle of german architecture and historical grandeur, off to full advantage. Can you see gilpil???


I'm a big fan of the grooves he cut in it....not sure how he got them so uniform...this never happens for me!!!

Thursday 12 March 2009

graffiti...a form of "ink-spression"

hands up who loves the 80s!.........yup me too!
...
Well this is a retro craft in more ways than one. I did it a while ago and it is quite retro-tastic looking! It was fun to do such a scruffy, "just go for it" type craft, rather than counting stitches, securing threads and ironing hems flat.
I just used permanent markers and the graphics have stayed put very well. I filled in the white space by writing my favourite bible verse on the top, and drawing a stick man doing "stayin alive" a la Saturday Night Fever.

Graphics on the pockets helped to hide the dirt that a white bag inevitably accumulates!!

I also did the same to a pair of white sneakers which turned out really well (but i never wear them because the back of the heel is really stiff and digs into my ankles...OUCH!!!)

Tuesday 10 March 2009

neat napkins!

Call me uncivilised but I had never really used napkins when eating (at home) unless i was having a dinner party and they matched my tableware.....
....enter SuperD with his rich juicy sauces and creamy, sticky risottos and napkins were promoted to every day usage!!! But with no nice napkin holder (and HATING all the ugly ones in the shops) i sketched a rough outline of the "dream-napkin-holder" and SuperD got to making sawdust!!!
Here are the measurements we used, this fits the (large size) ikea napkins:
SuperD hand-sawed the little windows and hand-carved the little hearts (cute!!). The wood was pretty poor quality (being a sort of chipboard sandwich) so hammering nails in caused a few splitting problems. SuperD recommended a staple gun to join, as shown below, and a little bit of wood glue for good measure!
Then paint it up and admire!
I LOVE the little hearts (you may have realised by now that i'm partial to chubby heart shapes). The rod across the middle acts to weigh down the napkins so you can set it outside and they don't all blow away in the wind....however with the wind strength being what it is in my part of the world...it would take me weighing them down to prevent them floating off...and even then, maybe not (she says "wishful-thinking-ly")
But it also can be used as a carrying handle! (excuse my weirdly deformed hand in this pic...its a difficult shot to take without "go-go-gadget arm!!!"


Monday 9 March 2009

put on your easter bonnet!

I wanted to get busy with crochet-zilla again and so decided to crochet myself (and poog's self) up some springtime.

And what's more springy than an easter bonnet i'd like to know???!!!

The idea for daffodils came from this crochet blog but i sortof made up the pattern as i went along. I am keen to take suggestions for other springtime stuff that i could crochet and sew to bonnets...i'm really loving this, plus with crochet-zilla it takes only 30mins per hat!!!

wearing my heart round my neck?

Ever dream of the "perfect necklace" for you and just wish that you could have it for real???

Well i did...and now i do!!!!!

Super D handcarved me a wooden heart and painted it pillarbox red...is there any happier sight?

Thanks D, i'm sooooooo in love with it!

He's my superhero <3

SuperD..protecting clean clothes everywhere!

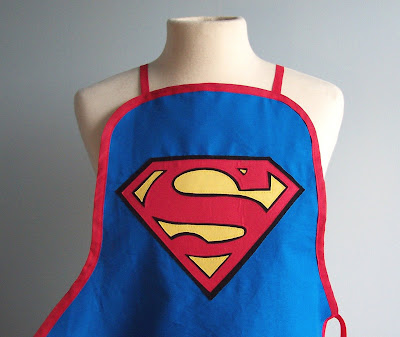
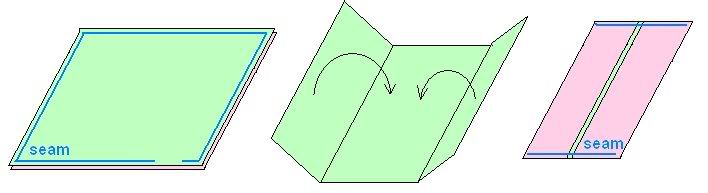
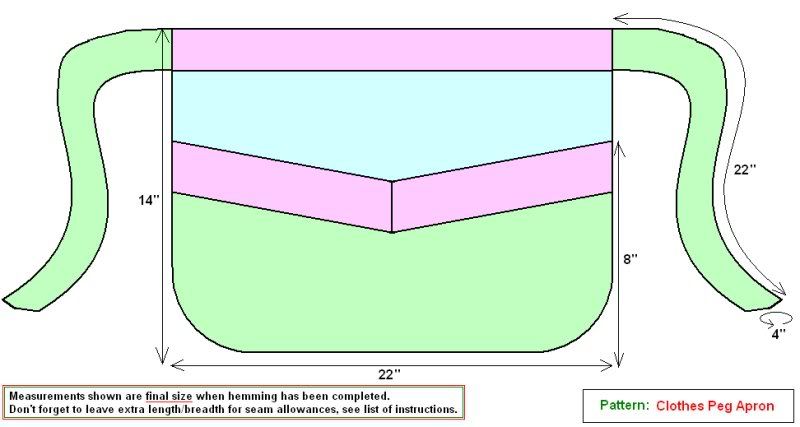
So with the number of deep and enduring stains of passata, coffee, olive oil...and i really don't know what the rest of them are... that occur in our kitchen... it was really only a matter of time before i imposed the "apron rule" on SuperD.


He readily agreed... as long as there were no hearts or applique ginger-bread men on it ("c'mon....would i???"... she says, deeply disappointed because gingermen would totally have rocked!) So i tried to make one that would live up to his superhero status, as follows:


1. Cut 2 apron shapes using the measurements given in the pic below. (one will be the lining)


2. You'll need to secure the "decoration" with iron-on fusable webbing before sewing. I made a template from a superhero crest (i can't post the crest as it breaches copyright, but it was pretty easy to find online) and started to cut out the pieces in the 3 different colours.


Uh-oh....see what i've done there?? Yup, don't forget to turn the template upside down when cutting out or you will end up with pattern in reverse when you turn it over to iron and fuse it on!!


NOOOOOOOOOOOOOOO!!!

-learn from my mistake...don't watch Colin Farrell movies when trying to concentrate on sewing


3. Here are all the (correct) pieces (bondaweb on the back) ready for ironing. Just iron down the base material to the correct position on the apron front first and then layer on all the rest of the little pieces. Easy!


4. Then for the sewing fun! Just sew running stich around all the decoration pieces to secure...doesn't it look great??

5. Then you'll want to put the finished apron front and lining, wrong-sides-together and sew around the edge leaving 1 cm seam allowance.

6. Sew coordinating bias binding around the edge.

7. Cut, fold and sew 3 more pieces of bias binding, to form the neck strap (25"), and the two ties (30" each). Sew these into position.

It really is that easy!!!!

(but don't forget the Colin Farrell thing...seriously...i was DEEPLY displeased)

i just can't get enough!!

haha moooooore magnets!!! I'm loving this craft... it is super simple!!!
I made little eraser stamps of dario's and my face and stamped some black ink on the magnet material as shown below. (Sorry that the picture is soo small and hard to read...it was pretty dark when i was photographing them and i couldn't see that they were so blurry!)
Can you read the little purple "loves" in the middle??? Again...this one is waaaay clearer in "real life"....aww.....i wish i could use a camera!
o i love the "purple bow - orange hug-me" combo on the milano-by-night postcard.....fun!!!

Tuesday 3 March 2009

at the copa...copa-cabana!!

Can you guess what i made on my recent trip to italia? (Note: possession of a travelling craft is very important to my sanity)


Welcome Copa and Cabana.


Patterns here: little pig and little elephant

The names originated from lil'pil's crazed love of italian cured meat, as when i presented her with the little porcine travelling companion for her long and tortuous trip to Deutschland, she considered naming him "Hamm" or "Copa" (the aforementioned italian cured meat)...we settled for "Copa".

...and then "Cabana" was an obvious choice for his little friend....but no calling him cabana-boy....he doesn't like it!!!

They are such little posers!!

The Garden of Eatin'.....(sorry!)

........audible groan at my terrible "pun-tastic" title.............

Well i haven't posted any baking posts in a while so I thought I would add this one.


And just to get everybody in the mood for springtime...here's a pic of the inspiration which was given to me in bulb form by the wonderful Pamela who also donates craft supplies to the needy cause that is my craft room!!!!.....thanks Pamela, the flowers are beautiful, a burst of spring in a dark mono-colour post-winter garden!!!!!

and now back to the edible ones....


I getting a "shiver-high" (as my mum says) just by thinking about eating these

.....mmmmMMmmmm!!