Saturday 31 October 2009

pumpkin pal

All summer in the garden of houseof spoon a little plant has been growing inch by inch... it was the smallest of 7 seedlings that i planted and there was no room in the vegetable border for him so i stuck him in a spare pot and set him on the patio...well, when all the other plants succumbed to some weird disease and wilted...he went on. He managed to grow one little fruit which i've been looking forward to, sooo much!!! Meet my little pumpkin pal!!!

He's pretty small as far as pumpkins usually go, but very friendlyHe was given the honour of being the centrepiece at my mamma's hallowe'en table!

I was sooo proud!!!It's just possible that i over-did it on taking photos of him.....but there really is nothing like growing and carving your own!!
Happy Hallowe'en!!!

Friday 30 October 2009

pumpkin party dress!

Halloween is coming and the goose is getting fat! (you can judge for yourselves in the following pictures! lol)

Well, someone is getting fat, because when i tried to put my prized pumpkin halloween party dress onto my dress-form Sam, i couldn't get her well-round hip ensemble past the waistband!! (Note, i wasn't even attempting to get it over her chest and shoulders...the girl would be the envy of Dynasty, she has no need for shoulder pads, that's all i'm saying!) The shocking thing was I think i actually made this dress to fit her a couple of years ago...she's obviously been munching on the sweets i keep in the sewing room!!! Anyway I gave up at the peril of splitting the stitching...but then gave a frantic last ditch attempt to wedge her in, seams straining and material puckering, when i realised that if it wasn't going on her...i was going to have to wear it myself!!! (i HATE pics of myself to be on the internet - a personal weirdness)

Anyway...here is my favourite party dress that i only get to wear once a year at halloween parties! I had intended to make a new one every year, but i love this one so much i never want to change!! I made up the pattern (it's a pretty simple one) and built it around a bargain corset that i got for a couple of £'s (NB i hate when people put apostraphies in terms like this, but i'll admit that in this case it looked a little odd without it) I trimmed it up-top with black PVC (fun material - nightmare to sew, because it sticks to the presser foot, i sewed through baking paper and then tore it away!!!) and added a few metal rings for hanging halloween stuff, if i felt like it.


I made a simple petticoat out of orange and black net to give it a bit of shape. (it has a straight hemline, no matter how it looks in the pic below...a bit of material is caught-up in the waistband...ooops! the trials of trying to take pictures of yourself...but at least you can see the petticoat a bit better!) It's also laced up the back corset-style with a black ribbonI bought the material ages ago, so imagine my delight when i saw in a £-shop last year a full range of pumpkin party dress accessories!!! Pumpkin-patterned fairy wings, a wand, hair clips and a handbag. I was pretty excited!!!

stationery scullduggery!

Ok it was getting a bit ridiculous that it is halloween and i am spending all my time making christmas crafts for an upcoming craft workshop and fair that i've been asked to take...no halloween crafts were getting a look in! The reason being that i am not hosting the halloween party this year and therefore have not needed to engage in producing decorations or themed food! So, in desperation i sought out some halloween material and ran up a little Christmas pressie pencilcase for one of my divinely gorgeous italian nephews, Daniele. (There are 5 of them so i have to start early, and they are really into skully things! )

He asked me for one of these the last time we were over in Torino and i promised to make one for our Christmas visit. My favourite parts are the PVC "tag/handle-things"(i LOVE PVC) and the shocking blood-red lining! Does this count as a halloween craft?? Does it?? C'mon...skulls,.. blood red...i'm really trying here!!

Thursday 29 October 2009

last cake standing!

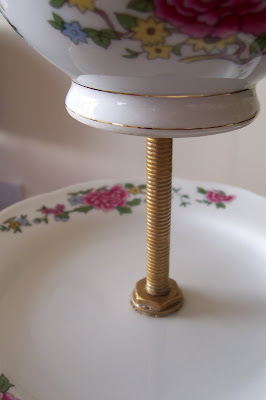
I've always wanted a cake stand, there's something so kitchy-gentile about it...and when it's full of little decorated buns...gorgeous, in a really housewifely-satisfying kindof way. Only problem was....i could never find one!! Or at least the ones that i found were either "modern-style" and just not the sort of kitchy-patterned type that would make my heart happy...OR they were £100,000,000...000...000, you see where i'm going here.
I pleaded with SuperD to save the day...he sent me out to a car-boot sale to buy some grannyish china (i got a full tea-set for £5!! SCORE!! Car-boot sales are my new guilty pleasure! lol), while he went to B&Q to pick up the technical stuff (giant steel screw rod and huge nuts and bolts that terrified the life out of me when i saw them...i was thinking: "D this has going to hold up a saucer of iced cupcakes not the Millau bridge!!!"...but, how right he was!!!
When he got started drilling the china i swiftly left the room, not being a fan of loud grating, scraping, screechy noises (you can imagine i'm sure). He even filled them with water to try and dull the sound...it didn't...shudder. The agreed order was to be sugar bowl - saucer - side plate - serving plate, buuuut the saucers all succumbed to the pressure and cracked down the centre one after another, leaving us with two side plates in the centre, it throws off the triangular shape a little, buuut there is now room for more buns so i got over it pretty quickly!!
I was very sceptical about the big screw rod, but he painted it gold and cut all the nuts in half so that they wouldn't look quite so industrial...and now i can't think how else he could have done it!! (Note to self: time to start trusting in SuperD's crazy schemes).
I can't wait to fill the bowl with colourful sweets!!! KITCH-TASTIC!!!!

Wednesday 28 October 2009

slip into something more comfy!

Well after 6 months of constant wear about the house and even around the garden(!!) my rainbow slippers that i made from this cool tutorial, were getting a little scruffy (there's even a hole in the upholstery weight suede sole!!...actually - i just checked - make that 3 holes!) so it was time for a new pair!! I had big plans for a christmas themed pair, but in the meantime decided to go for another colourful version. This material is some designer i think...i remember choking at the counter when i realised the price (and i was only buying half a metre!), so i wanted to use it for something that i use every day to get my money's worth!!

The only changes i made to the pattern were to lengthen the two sides of the top piece, giving more space at the heel (i had to add an extra piece last time, although i don't understand why because i think the pattern is supposed to be for a UK5, EUR38, US7 ??) ; and i used regular weight quilt wadding/batting this time, which was a lot easier to work with! I still used oven glove wadding/batting for the sole though, because it is more dense and more spongy!

I used an upholstery weight corduroy for the sole as i thought it might be more hard-wearing but...it certainly is more slippy, so i'll have to be careful on the tiles!!I love this pattern...so quick and easy and has a real impact!! Every time i catch sight of them i get a little thrill of cuteness!!

Thursday 22 October 2009

ooh!! at the office 5

It was the turn of the lilac shirt...now what on earth to do??!! Of all the ones I did before I liked the cap type sleeves best as they give maximum freedom of movement and look pretty too. See number 1, number 2, number 3 and number 4.

So rather than another frill, i went for pleats. This was made in the same way as the double frill piece of number 3. I removed the sleeves and cut from each one a piece 3"x15" and piece 2"x12". (These could both be 15" in length but this shirt's original sleeves didn't have enough material.) The pieces are then hemmed along one long edge with a rolled seam. Then take a short piece and lay it on a longer piece and secure with a line of stitches through both pieces, along the long rough edge. Then make your pleats (in whichever direction you like), ironing as you go, and pin in place before sewing another line of stitches through both layers, in the same place as the last line. You should have something like the picture below:
Then it's just a matter of sewing in place and finishing the rest of the armhole with a rolled seam

Again, i also took the shirt in a little at the sides to make it more fitted.
And here she is all dressed up and ready for the boardroom!
I also do a row of top-stitches about 0.5cm in from the edge of the armhole, just to ensure that the inner rough seams of the cap sleeve lie flat and don't peek out! It's also worth serging these if you have an overlocker....i'm just loving the way i'm mixing UK/US terminology with the inches vs centimetres and sergers vs overlockers...but it makes sense in my head so we'll not worry!

carboy cosies!

(the title is a bit of a cheat because we call them "demi-johns" in the UK, but carboys just fitted the alliteration!!)

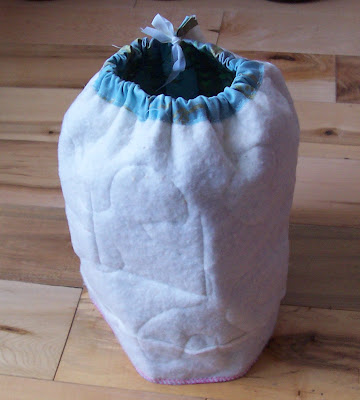
Haha..well i managed to mix brewing and sewing! You see, the yeast in the demi-js needs to be kept warm and mine are stored in a pretty chilly utility room...so i made them little fleecey cosies!!
You probably can't read my labels in this tiny picture, but we've got Plum Perfection, Blackberry Bliss, Amazing Apple and Gorgeous Grape wines bubbling away inside those little cosies.
The pattern was simply 24"x12" with a layer of quilt batting on the inside, that will fit a 5 litre demi-j or a 1 gallon carboy for those across the ocean.

"Hey blackberry bliss! Get your cosy on!! I know this is your second feature online, but that's no way to gain lasting respect!! Have i taught you nothing?!"
oooh! now they're all at it!!!...but don't they look tasty!!!! mmmmMMmm!

Wednesday 21 October 2009

Blackberry Bliss!

This is a bit of a different "craft", becuase usually i keep food and wine posts for my family and garden blog, but this one is just simply too good to miss out on!! And since a very kind person has posted an online tutorial it won't be very difficult for me to explain what you need to do! This is my new hobby which has kept me occupied since the summer (hence the slow rate of houseofspoon blog posting!!!)

Brewing your own is a lot of fun and surprisingly simple (when you keep it organic and shun the added chemicals, as we do!!) See the original tutorial for "Mighty Fine Blackberry Wine".

I tasted it last week and it was heavenly!!! And so easy, you can drink within the year!!!What a colour!! The best thing is, you can use almost any fruit!! Next time you're in the supermarket and there is something on offer....buy it...FERMENTING IS THE FUTURE!! (lol, that may be overstating it..but only a little)

...now i just have to think of a way of combining brewing and sewing...then i'd be really excited!

casa dolce BIRD casa!

Super D didn't have a lot of super-jobs one day (you know, the usual rescuing endangered wenches and halting runaway trains)...it was a quiet afternoon and he decided to make me a cute pressie!!!Sweeeeeet! A little birdhouse! I adore it! I am totally not putting it outside...it's going to hang from a wall hook somewhere in houseofspoon (too bad birdies!!!)

He even put some faux bedding material in there so i can pretend that there is a wee chubby chirpy chick snoozing away inside!!

Thursday 15 October 2009

ooh!! at the office 4

Time for number 4! (See number 1, number 2 and number 3) This time i went for the good old PUFF! I'm still going through the ugly colours of shirts because i don't trust myself!!

This is the pattern i used for the puffed sleeves..can you read the measurements? The template is 10" by 8" and the left hand side is placed on a fold. I didn't have the full size in one piece of material as i was just using the straight 3/4 length sleeves that i cut off the original shirt, but just neatly piece it together, you won't notice it in the final design. Seam the outer edge and attach to the shirt in the normal way, then sew a legth of elastic 0.75" from the seamed edge. I secured the elastic at each end, to ensure that they stay put!
Here she is from behind in all her puffy glory!

She was taken in at the sides as well, removing a bit of the blousy-ness!
And here she is all dressed up!! Can't wait to wear her!
Note: if making this version, it's worth checking the elasticity of your elastic to make sure you aren't making the arms so tight that you're going to stop your blood supply... and remember...puffy is pretty!!!