Tuesday 31 May 2011

invite in a bottle

So the last weddingy post i'm going to do is just squeaking in on the last day of May (ahem - cheating notwithstanding) The invites were the first glimpse the guests were going to see of the wedding-theme. I made up little glass bottles (about 5" high - bought online) adding some sand in the bottom from Brown's Bay, the beach near my house, and some little shells - one simple white "cockleshell" from The Cove (a different beach down the street from me...in ireland there's almost always a beach down the street!!) and a tropical shell bought off the internet.

The name tag was just written on rough recycled card and tied on with string.
So that the invite could be accessed easily without sand-spillage i put a drawing pin through the ribbon and into the base of the cork. Easy as that.
It was definitely more fun to have the guests have to open and unroll their invite rather than just open the envelope. We sent some of the bottles to SuperD's family in Italy...must have been quite strange to open a package and find a message in a bottle!
And i had some bottles left over, so we used them in the table-centre beach-rock-garden things and also on the cake. I printed out little bible verses and opened them up inside.
Cute!

something crafted, something blue

I had made cool beach-rock-garden things for the table-centres for my wedding and had done out instructions for the hotel so that they would make them up just right - but i've lost the photos! This was in the days before any thought of a craft blog so i didn't keep them unfortunately. They had little "water-pools" of blue glass nuggets and everything! Oh well...i'll show something a little more simple but still wedding themed.....

So with all the chunky jewellery that we were wearing on the day, i wanted something simple for my earrings. It had to match in with the seaside theme with shells and pearls and with a touch of blue.
These took all of 5 minutes but they were just right on the day.

Friday 27 May 2011

stones from the sea

Since the theme at our wedding was to be the seaside, I choose some very scruffy natural looking pebbles from the beach near to our house on which to write the names for the guests' placecards. I glued little shells and mini dried starfish on them just to add something fun.
The groom was the only one with a black pebble and these two still sit on the windowsill in our kitchen - a memory of a beautiful day.

Thursday 26 May 2011

string your own stones

Since the colours i chose for my bridesmaids weren't really a standard combination it was proving difficult to get jewellery to match...so we made our own. We bought a bunch of mixed stones in the colour palette i wanted and set to work stringing them all quasi-randomly together. This allowed us to add a couple of little marine-themed charms and mini shells etc so as to tie in with the sea-theme.
I had the very welcome assistance of poog from Gingerbelle Jewellery who did a fabulous job advising me and helping to make the necklaces. It just added a lot to the fun of the day that we were able to be so involved in making the pieces.
click on the pic to enlarge!

ridiculously large rings!

Another aspect of the fun jewellery for my wedding was to be enormous dress rings that would match the colours of the girls' dresses.

You can just about make them out in this picture - click on the pic to enlarge - i really should've taken proper ones but didn't think of it at the time. The dark blue ring was made of lots of pieces of flat coral-shell all strung onto a base, so they were free to move about. The aqua blue was wired in the shape of a flower with little pearls in the centre and the sea-foam green was wired like a 4 leaf clover, again with the pearls at the centre...all were just wired to a simple base made by shaping silver wire.
easy-peasy!

flower power of 3

Since i had so many wedding themed posts, i thought i'd just go ahead and make this marriage-themed-may. So i decided to add a couple of retro crafts from my wedding...that occurred before i began the craft blog and so i didn't take great photos of the stuff, so bear with me!

I begin with a cheat post, i had wanted to make this craft, but couldn't get the quality of flowers that my florist could, so i told her what i wanted and she made these little corsages for my bridesmaids. The idea was to be low-key and carefree, so i didn't want to have them wandering around having to hold a bunch of flowers.
I was so delighted by how they turned out - i thought they were a lot of fun and not so serious as a reserved posy would have been.

Thursday 19 May 2011

it's jennifer!

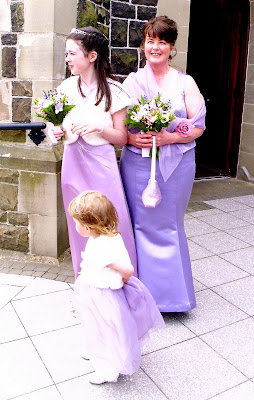
And last but not least...the adult bridesmaid, Jennifer. She had chosen a 2 piece outfit with a fitted bodice top and a dramatic fish-tail skirt. Again made with the crepe backed satin. (yes it needs ironed too - sorry!)
I also made a shawl/stole thing out of the organza that the girls had on their dresses. I simply cut out a shape i liked, with long pointed ends, and then baby-hemmed the whole thing.
Jennifer wanted a loop to thread the shawl though so that it wouldn't slide down on the day. I attached one to the bottom of the strap.
Rather than make something permanent I made two loops of thread that would hold the loop in place.
And rather than sewing on snaps or poppers (which i hate doing) i embedded two super-strong mini magnets inside the loop. They had a really strong closure and yet there was no scratchy snap or stitches on the outside.
I did the same label with the free motion quilting but this time used a silver embroidery thread.
And here she is!
I just had to add a link to this gorgeous picture taking by the official photographer as it showed everyone together...hope i don't get into trouble for posting his photo!!
And just to finish, i couldn't miss but to add a picture of the groom...complete with kilt! Don't they all look gorgeous!

it's natasha!

And then there was Natasha..same style as Aimee's simple bodice with the A-line skirt, but this time out of a very drapey satin. I didn't add any organza to this one so it looked a little more grown-up.
The fabric was so heavy that the bow was drooping constantly so i added two little stitches to keep the bow at the right height.
They were invisible when the bow was tied...the colour in these pics is weird...not totally sure why..?!
Again i put the little label in down near the hem, and she only noticed it at the end of the day!
And here she is! Looking gorgeous of course...it really was such an easy job i had!!

it's aimee!

And then there was the flower-girl's big sister....Aimee wore a similar style but with a "big-girl" skirt that was just A-line to the ground. (sorry about the pic...as usual i haven't ironed it before photographing!!)
This one had the same organza layer but no gathering...and the big bow of course!
I put a little label in each of the dresses to remind of the special day.
And here she is in all her finery...and with a mini fur coat too....sooo cute!!

it's jodie!

So i'm delighted that i can finally post the bridesmaid dresses that i've been working on!!

Firstly is the little flowergirl with the simple bodice in muave-crepe-backed-pearl-satin with a ballet-style puffy organza skirt. The flower and ribbons were added to tone in the rest of the wedding colours.
I loved the cute little low back and the big puffy bow!!
And here she is herself - ADORABLE!!