Tuesday, 31 January 2012

bright coloured burp cloths

So apparently another invaluable thing to have is these long towel things to lay under the baby's head while feeding and lay over your shoulder when trying to get the wind up....i've seen babies in action and a muslin doesn't really cut it...you definitely get some lovely soak-through onto the shoulder of whatever you're wearing. So in the interests of remaining baby-bodily-fluid-stain-free, i decided to rustle up some heavy duty absorbers.

I found these bright microfibre dishcloths in a discount shop and simply cut them in two pieces down the centre, rounded the corners and bias bound with a contrasting colour.
Easy peasy!

day-glo onsies

So I made more of the dyed onsies, this time with short sleeves and socks to match! lol! I love how the thread doesn't take the colour so it stays white...it kindof looks like a little trim. I couldn't decide how to decorate these vests, but then decided that, because they are already so bright...it would perhaps be over-kill to add any more detail!
Me?...over-accessorising?? surely not!!! lol!

camping playmat - babyroom12

Did i mention before that i'm fed up doing free-motion quilting with my temperamental sewing machine?? Well now i really am...groan...please no more!! So i wanted a play mat that i could bring around with me to put the baby on so that he doesn't throw up on other people's carpets or sofas etc.
Again i appliqued on the little camping shapes and then free-motion quilted all the background. This time i used the larger version of the camping stencils that i had made for the wall-motifs. This was for pure laziness really...i thought if i used the bigger ones then i wouldn't need to use so many...lol!
I used quite a few layers of quilt batting in this one so that it'll be nice and spongy to lie on.
I think i may make this into a baby-gym for the first few months.... if i have time.

ciao bambino!

So while i was dying the muslins I also did a bunch of onsies and baby sleepsuits of various sizes. This is really for the same reason....lots of pastel blue available in the shops but not so many bright colours. Actually my blue looks very pale in this pic but it is actually quite bright...the light here was awful. The purple one was dyed in half the water which seems to give a more patchy tie-dye effect. Lastly, i added little freezer paper stencils on the front to personalise them a bit!

mountains of muslins

So apparently muslins are pretty useful when you have a baby, they're just like very absorbent, soft cloths and have millions of uses, so i had to get myself some. However, then i discovered that they are mostly plain white (yeah i know!...the flesh rebels!) or you can pay double the price for some anaemic pastel baby blue or pink ones....LAME! So i bought some of the cheap white ones and got busy dying them with my "freecycle-find" coldwater dyes.
I had never dyed any thing before so i was a bit vague about the quantities of water to powder to soda ash etc....but they turned out ok! I did learn however that trying to use less water (see the olive green ones) doesn't give such a homogeneous colour...but hey, every day's a school day. It was only really at the end that i thought of making patterns...for the orange one below i pulled lots of little bunches of the material up and put little hair elastic bands around, so they were shielded from the dye....looks quite cool i thought!
I tried it wish the sky-blue ones as well, but it's less obvious in the photo. The other blue ones were knotted and tied in strange bundles so the colour is quite patchy in a sortof vague pattern.
I also thought these little mini towels could come in useful as well, for wiping up messes and since they were 20p each from ikea, i thought i couldn't go wrong. They were a very nasty off-cream colour before they were mercilessly plunged into the dye bucket....and now...ahhh! much better!

dip-dyed baby clothes

There's really not much point in spending a lot of money or time on baby clothes for the first couple of months since they grow so fast and all the work would be wasted. Instead i bought some white sleepsuits in different sizes and dyed them up. The less water i used, the more patchy and tie-dyed the effect was (see the purple one) I can't decide though whether i want to add more detail to these...they look pretty boring...im thinking perhaps of making lino stamps or something to liven them up a little...hmmm.

flower garden change mat

So to accompany my nappy change bag, I need of course a travel change mat on which to plonk the baby when making the changes. Rather than buy expensive waterproof PUL i decided to try it out with this waterproof PVC table cover fabric. It was 1/10th of the price and was much more colourful than the PUL on offer.
Another plus is that it is backed with a soft spongey fabric. I added two layers of wadding as well just to make it nice and extra cushioned, and then backed it with this shiny-backed orange cotton that i found on sale.
And so you just need to fold it in 4 and slip it into the appropriate pocket in the change bag and I'm good to go!

Wednesday, 18 January 2012

nappy bag - babyroom11

So something else i definitely needed was a nappy change bag to carry about all the baby kit with me when i visit with mamma or friends or whatever. I decided to make a big one as i never know how much rubbish i might need to cart around with me!
I free-motion quilted the bag to an underlining to give it extra stiffness so it will sit upright even when empty. And of course i had to add the camping motif to tie it in to the rest of the baby's stuff!! lol
I lined the bag with this cute flowery Laura Ashley fabric i found in my stash and made a little stiff separator insert thing to split the bag into two inner pockets. I also added a clear PVC pocket on the front to carry around a little notebook to note down time of changes and feeds etc.
The back of the bag has a big flat pocket the full length of the bag..can you see it, half way up the back panel?....i'm making a little change mat to be folded up and slipped in here.
The flap is nice and long and closes with velcro.
I decided to do a bit of free-hand embroidery on the inside of the flap just to add something special to personalise the bag.
It was great fun..i think i need to do a bit more of that kind of craft - i really enjoy rough embroidery.

camping mobile - babyroom10

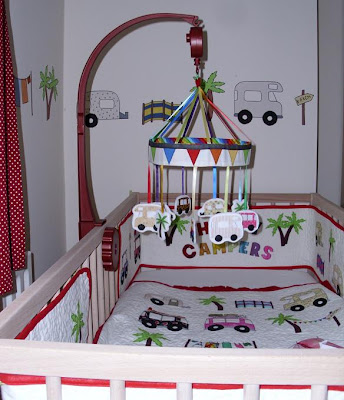
So i wanted a cot mobile to match the whole camping theme and they are so expensive! I wanted to get just the stand and the musical box bit but it was even more expensive to buy them on their own, if you can believe it?! So i bought a cheap second-hand mobile off ebay for 99p. The plastic was all dis-coloured with age and the hanging bit was tired looking.
I threw out the hanging bit and got my lovely daddy to prime and spray paint the stand and the musical box with left-over pearlescent motorbike paint, which turned out to be the perfect shade of red to match in with the theme!! Brilliant!! You don't need to worry about the baby-safeness of the paint because as soon as the baby is able to move independently you are supposed to remove the mobile anyway - so he should never really come in contact with it.
So then i just sewed a reinforced circle and hung it from rainbow ribbons caught in a wee red felt heart at the top loop. It was pretty difficult to get them all about the same tension so that the mobile would hang straight....i sortof managed it.
I had sewed little pieces of the rainbow ribbon hanging from the reinforced circle, with little camping charms sewn on white felt, each mirroring the appliques on the cot quilt and bumpers etc.
It's really becoming a bit of a camping explosion in this room....i might have to stop accessorising sometime soon!!!

dummy clips!

So a very important thing to get organised is the method of quietening the baby, for when he finally arrives...you know, when i've important crafting to do and need peace and quiet? So dummies are a must but the clips that you can buy to keep them from falling on the ground are pretty boring and with huge big plastic clips.

I bought a couple of braces clips in the craft shop and mounted some patterned grosgrain ribbon with little pieces of velcro (for easy removal for cleaning - very necessary of course!!)
easy peasy!