Tuesday, 31 August 2010

matrimonial mermaid chic!

With all that camping time taken out of the craft-time of this month, i decided to post a retro-craft to make up my 10 pieces for august.

I wanted to have something to put in my hair for my wedding that would match with the seaside theme and match with my shells & beads jewellery. Not knowing what sort of thing that i was looking for, i made a strange shape out of wire to act as a frame and then attached shells, pearls and beads in my wedding colours. SuperD drilled little microholes in each piece for me...yay a team effort even then!
This is the underside...kindof messy, as you can see!!
And this is the piece on the day...thanks for the photo Roj, i'm so glad i have the craft evidence!!!
All my gorgeous bridesmaids had little mini versions on kirby grips to match each of their dress colours...gorgeous!

HOT wall hanging!

With the bumper crop of large chilli peppers that has resulted from my finally having a real greenhouse (thanks SuperD! Ti amo!!) we are looking for ways to dry them out to keep them good for longer...because really...how many chillis can you eat at one time?!

We have a bowl in the kitchen where a bunch are drying nicely, but the difficult thing is that must be kept very dry or else they go off, and start to rot....NOT what i want for my beautiful home-grown babies!

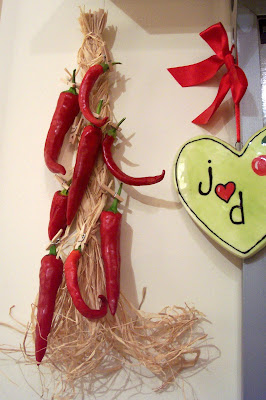
The best thing to do is to hang them! I made a quick plait out of raffia to hang in the kitchen to hold some of the bigger drying chillis.
I wove in little pieces of raffia with mini clothes pegs tied to each end, so as to attach and remove the chillis more quickly and easily.
The clothes pegs aren't very visible from a distance and it really makes it so much safer for the chillis as, while they dry, they shrink a little, so if i had just tied them on, they would shrink and fall out....perish the thought!!!
Now...i fancy attempting a chilli-wreath of some kind...more raffia please!!!

Friday, 27 August 2010

hand-pieced baby ball

I've been dying to do something hand-pieced for quite a while now so decided to do an early baby present for...whoever! The little pentagons were cut in paper and set on a slightly larger piece of material...the edges of the material are then ironed flat, enclosing the paper..you can faintly see the inner overlap in the white pentagon in the pic below. Its a good idea to do a couple of rough basting stitches through the material and paper to hold it together at this stage...these will of course be removed at the end. You'll need to do 12 of these to make a ball.
Then sew all the little stiff pentagons in place by hand. Sew at the very edge of the templates and don't enclose the paper in the stitches. Before you stuff the ball, rip out all the basting stitches and pull out all the paper templates. Then stuff and close, and give to the nearest baby!
I also did 2 little quick cross-stich panels to give it a bit more character. Now how easy was that?! I feel a couple more of this things coming on...maybe this time i'll remember to take a photo of the middle stages!

Thursday, 26 August 2010

camping stamping

Guess where i'm going this weekend???!!! Yep! you guessed it the blessed day has arrived! Everybody is getting packed up and on the road...soo exciting!Stamps made as usual from simple pencil eraser cut out with a craft knife. I've been looking forward to this trip since i came home from the last one in July! So much so that we even had a holiday themed dinner to celebrate!! So i got to use my stamps on the napkins!!...these are a couple i came upon when clearing up the party...made me smile again...yay holidays!!

Sunday, 22 August 2010

spotty stool

I also got a frame for a little stool and so very simply made a seat (well reinforced of course!!) from some more ikea fabric. This one will be used to hold the box of buns from which i will be feeding my face over the weekend...yay holidays!!
...or else it will be holding the box of threads for my cross-stitch!! lol! either way it will be used for festive holiday purposes!!

deckchair makeover

So..still on the subject of camping (come on the weekend!!) I acquired a pair of these from my mamma's garage clear-out.
A bit of measuring and stitching with some of my left-over ikea upholstery weight fabric...
...and da-daa!! Good as new deckchairs for brightening up our camping space!
I didn't have enough of any material to make two the same...but it's probably better that way with a bit of mix-and-match!
There really isn't much of a pattern...i basically just bound the edges of the heavy fabric with bias binding and reinforced the seams four times at each point to be sure that they are not going to snap and deposit the unfortunate sitter on the grass! (That still might happen!...i will report back if it does!!)

camp cool

So anyway...i'm going camping at the weekend - WOOP WOOP!! I'm pretty over-excited about it, and talk about nothing else at the minute...well maybe also about craft...but nothing else! We have a brand new (palatial) tent which is fabulous but unfortunately is grey and green and sadly in need of some houseofspoon treatment to make it campsite-ready.

I rustled up a little bunting banner which i'll hang between the two bedrooms to welcome all our campsite vistors to the tentofspoon!! lol there's a whole other blog right there!
I acquired a bag of tie-dye scraps which were just big enough for the bunting pennants. Just used regular bias binding to hold it all together...
...add a few ribbons and pompoms and it's ready to liven up our rather understated canvas palace! lol

Saturday, 21 August 2010

jorinde jacket

Wow thank goodness that is over!! I made another of the free patterns from Burdastyle, the Jorinde Jacket.

I should have read the reviewers' comments on this one before starting...it seems that everyone was having trouble following the very vague instructions!! The pattern is labelled as advanced sewers only, but really there is no need for advanced tag, if only the instructions were clearer (ie. "made any sense") then i think anyone could make it! It's like: "sew that part to the other piece and snip into the corner"...what part? to what piece?...what corner???? groan. Also a few pictures wouldn't hurt!! A couple of times i just had to go freestyle and hope for the best!

That said, it turned out pretty well so i might be tempted to try it in a nicer material...i said might be tempted...but just not yet!!! When the memory of the nights of frustration and the millions of tea-breaks spent whining to SuperD about the pattern, have faded from my mind....then i'll have another go!
...but really what do i want from a completely free pattern??

Note to self: stop complaining and get crafting!

Friday, 20 August 2010

write it in chocolate!

Sorry about the sporadic posting...i've limited access to blog-friendly computer systems at the minute!

So i was having a dinner party and since the main courses were quite heavy i wanted to go for a light dessert...but the people who were coming were all chocoholics! So we went for mini (extra-thick) italian hot chocolates and vanilla gelato with biscotti.

It was pretty lame, so i wanted to add something a bit more special...so i named them in chocolate!
Lyds and Dot complained that with a shortened name they were getting less chocolate!
George was happy enough because it's very difficult to shorten his name!

Thursday, 12 August 2010

easy-beady cross

..that's easy to say..! Well i'm in the middle of an unbelieveably frustrating sewing project...a simple-looking jacket, to feature soon of course...but it is really making me yearn to craft something quick and easy..like this!!
At the beginning i thought the wonky-ness annoyed me...then i just went ahead and got over it.
Now...back to the craft-room to progress this jacket a bit more...groan