
Ahhhhh!!!
If I lose another wool needle I think I will scream. I seem to have kept the wool-needle-producers in business over the years by successively losing every single new one that I purchase (and also a couple of those that my mum has purchased…but don’t tell her…I don’t think she has noticed!) Basically I’m lucky if I manage to keep the same one for the entirety of a project. The same goes for sewing scissors and crocket hooks. Time for something to be done…seriously, I can’t keep myself in crochet tools!!!!
There are a lot of crochet rolls online, but I didn’t see one that would fit my rather motley collection of oddly shaped tools. (Note: The bunny-stick is a cocktail stirrer that I use to turn pieces right-side-out because it has a rounded ball tip so I don’t puncture the material…i do realise how sad this is, that I use a cocktail stirrer for nerdy craft purposes…groan)
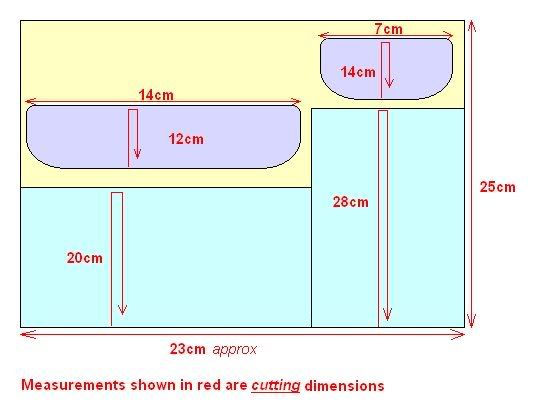
The measurements in the list below are those I used, you may wish to tailor to fit your tools! You may wish to keep all your “tools” on one level, but some of my tools were much bigger and I preferred to make two levels.
Cut 1:
Inner lining - blue cotton 25cm x 23cm
Outer material - flower pattern cotton 25cm x 23cm
Interfacing - 25cm x 23cm
Tall pocket - flower pattern cotton 28cm x 14cm
Short pocket - flower pattern cotton 20cm x 19cm
Tall pocket flap - blue gingham cotton 14cm x 7cm
Short pocket flap - blue gingham cotton 14cm x 12cm
Needle holder - white stiff aida (small piece)
Stitch marker holder - white stiff aida (small piece)
Bias binding
Elastic for closure (or use a button and cord OR 2 cords for tying if you prefer)
Instructions
I recommend cutting the inner lining piece a little bit longer than required, as you will be working from the left-hand-side and you can just trim at the right-hand-side when you are sure you have enough room. See basic outline below or click here
If I lose another wool needle I think I will scream. I seem to have kept the wool-needle-producers in business over the years by successively losing every single new one that I purchase (and also a couple of those that my mum has purchased…but don’t tell her…I don’t think she has noticed!) Basically I’m lucky if I manage to keep the same one for the entirety of a project. The same goes for sewing scissors and crocket hooks. Time for something to be done…seriously, I can’t keep myself in crochet tools!!!!
There are a lot of crochet rolls online, but I didn’t see one that would fit my rather motley collection of oddly shaped tools. (Note: The bunny-stick is a cocktail stirrer that I use to turn pieces right-side-out because it has a rounded ball tip so I don’t puncture the material…i do realise how sad this is, that I use a cocktail stirrer for nerdy craft purposes…groan)
The measurements in the list below are those I used, you may wish to tailor to fit your tools! You may wish to keep all your “tools” on one level, but some of my tools were much bigger and I preferred to make two levels.
Cut 1:
Inner lining - blue cotton 25cm x 23cm
Outer material - flower pattern cotton 25cm x 23cm
Interfacing - 25cm x 23cm
Tall pocket - flower pattern cotton 28cm x 14cm
Short pocket - flower pattern cotton 20cm x 19cm
Tall pocket flap - blue gingham cotton 14cm x 7cm
Short pocket flap - blue gingham cotton 14cm x 12cm
Needle holder - white stiff aida (small piece)
Stitch marker holder - white stiff aida (small piece)
Bias binding
Elastic for closure (or use a button and cord OR 2 cords for tying if you prefer)
Instructions
I recommend cutting the inner lining piece a little bit longer than required, as you will be working from the left-hand-side and you can just trim at the right-hand-side when you are sure you have enough room. See basic outline below or click here
 1. Fold the short pocket piece in half lengthwise and iron the fold. Sew the piece of aida to the pocket fabric for holding the needles. Position the pocket at the bottom right of the lining piece and sew the left vertical seam. It’s not necessary to fold under a seam allowance because we will be “bias binding” the edges.
2. I sewed the bottom horizontal seam of the pocket along the part where I am putting the finer crochet hooks, and stopped before the little pouch where I intend to put my scissors as this will require a little “tucking” of the pocket fabric, so that the lining piece will remain flat.

3. Insert all the tools and pin where the separating seams should go. Tuck under a 1cm seam allowance at the right-hand-side of the pocket. Now sew all the separating seams and the vertical seam at the right-hand-side. It will now be easy to make little tucks in the base of the scissors pouch. Pin these in place and sew along the remaining part of the short pocket bottom seam.

4. Fold the tall pocket piece in half lengthwise and iron the fold. Fold under a 1cm seam allowance at the left-hand side and sew the vertical seam in place immediately beside the end seam of the short pocket. Follow the same steps for dividing the pocket and making the tucked pockets where necessary. Sew the right-hand vertical seam to the lining and trim the lining 1cm beyond this seam (no need for seam allowance in the pocket fabric as we will be binding it).

5. Fold the short pocket flap in half and iron (to give shape 14cm x 6cm) and do same to tall pocket flap (to give shape 7cm x 7cm). Round off the two corners (further-est from the fold) and sew bias binding around the open edge. Now populate your tool wrap with the tools and pin the pocket flaps to the lining fabric, where they will best prevent the individual pieces from flying out when the roll is upside-down! Sew in place.

6. Sew the other piece of aida, for holding the stitch markers, into the gap. Add any decoration you wish into the remaining space.
7. Now iron the piece of interfacing to the outer fabric and place the outer and inner fabric pieces together (wrong-sides-facing). Now sew around the whole thing.
 Sew bias binding around the entire wrap. I cut two little pieces of elastic and tucked the edges into the bias binding while sewing around, as a closure, but you can use a button and cord, or even two ties for a simple bow closure.
And it’s done! And I haven’t lost a wool needle since!! (granted it has only been 2 days…but I’m pretty excited about that record!)

Have (organised) tools…will travel!


2 comments:
Anyone seen my precious wool needles anywhere????? OOOoooouuch! Ok scrap that question!!!
(PS what is a wool needle anyway?)
Is it a darning needle or one with a big eye?
Love the tools wrap! The material is really cute. Mama xox
I love your creation! Very beautiful!
Post a Comment