
Well, there is a pocket-size person I know who has been very good to me and I wanted to show my appreciation....what to do?...what to do?....i know! A little organiser wrap for shopping lists or holiday lists or any other lists that exist in life (if it's anything like my life, that's 1 million lists)
So here's how i did it!.....
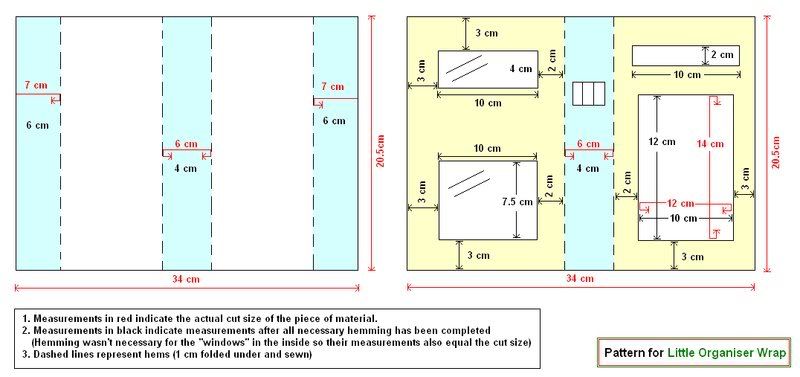
 Cut 1:
- white brocade 20.5cm x 34cm
- red gingham cotton 20.5cm x 34 cm
- red cotton 12cm x 14cm
- clear pvc 7.5cm x 10cm
- clear pvc 4cm x 10cm
- white aida 2cm x 10cm
- piece white elastic (for closure)
Cut 2:
- red gingham cotton 7cm x 20.5cm
- red gingham cotton 7cm x 20.5cm
- red cotton 6cm x 20.5cm
Click on this link or on the picture below to enlarge and read the measurements of the inside and the outside of the organiser wrap.

Instructions
1. Fold a 1 cm seam allowance under the inner one side of each of the small gingham pieces and sew as shown to the white brocade.
2. Fold a 1 cm seam allowance under each edge of one of the red cotton pieces and sew to the centre of the white brocade with a seam down each edge.
3. Do any decorating of the blank spaces now...i carved a little camper stamp from an eraser and used red fabric ink (Don't forget to heat seal the ink for permanence!)

4. For the inside, use the red gingham and sew a red cotton piece in the centre as before.
5. Bias bind the top of the pvc pieces and sew in the positions shown in pattern.
6. Hem the red cotton pocket with a 1 cm seam allowance at the mouth and sew into position, folding a 1 cm seam allowance under on the three other sides.
7. I pushed two document tags through the holes in the aida before sewing into position, so that the wrap can use recycled paper (once punched) as well as ready-made notebooks (slot the last page into the pocket to hold in place)
8. Add any further detail such as the elastic pen holder or little decorations.

9. Put the 2 finished pieces, right sides together, and sew around the outside leaving a...yes you guessed it....1 cm seam allowance. I also sewed in a layer of stiff interfacing, but you can use quilt batting for a "padded, squidgey" feel or don't bother adding anything...up to you. Don't forget to leave a little gap so you can turn it right side out.
10. Once the wrap is right-side-out, sew around the outer edge again (1 cm seam allowance) to reinforce the edge
11. I encorporated sewing in a piece of elastic into the last step as a closure...but you can use a loop and button, whatever you fancy.
12. I also made a little padded button to decorate the elastic (using the padded magnet method in another post) and embroidered mumito's name, just in case all the little campers didn't give away who owns it!!!
And it's done!!!


3 comments:
Fabu-wooni-lous! I'm soooo proud that I own this. It's sooo beautiful and cute and pretty and if it wasn't mine I would be very envious! It took a lot of work, I don't think I could've done it! So it's great that I didn't have to. Thanks a million billion trillion!
Mwa foof! Mummer xoxo
wow that is super cute! Thank you for sharing your tutorial!
You should submit this to this week's Make & Tell Monday at http://the6oclockstitch.blogspot.com
Post a Comment