
Well i wasn't sure what to do for mother's day, my mama being a "what did you spend your money on me for? i hate getting new things!!" type-of-person....yeah i know, where did i come from, right??!!
But this means that you're always safe with hand-made (involuntary shudder of delight at the prospect of a new project), and when she mentioned in passing that she really needed a new "peg-bag" (or "clothes pin bag" to mamas across the ocean) i got down to business......
 Cut 1:
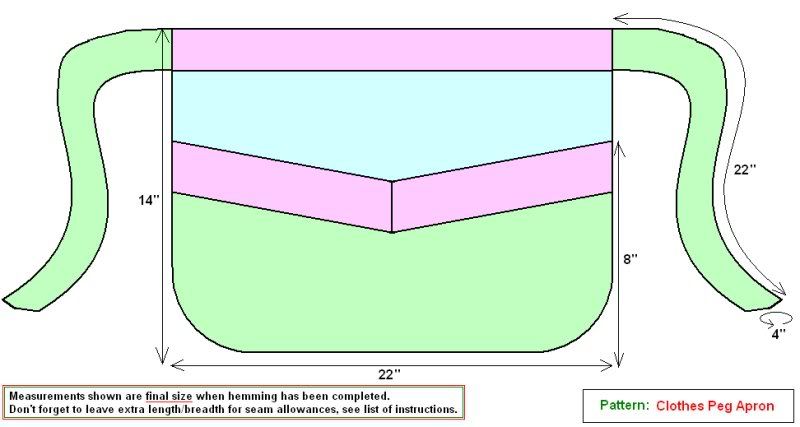
- base fabric (white with red polka dots) 22" x 14"
- pocket fabric (red cotton) 22" x 8"
- front waist band (red gingham cotton) 22" x 4"
Cut 2:
- pocket band fabric (red gingham cotton) 12" x 3"
- waist ties (red cotton) 22" x 4" (for you these could be longer...my mama is tiny)
You will also need coordinating bias binding and some decoration (i used chunky ric-rac, felt applique and some simple embroidery)
Click on this link or on the picture below to enlarge and read measurements of clothes peg apron.
 Instructions
1. Take the 2 pieces of pocket band fabric and sew them together end-to-end with a slightly angled seam so that the mouth of the pocket will dip in the centre in a v-shape.
2. Lay the v-shaped pocket band on the pocket fabric, folding a 1cm seam alloance under and sew at the bottom edge. Cut the pocket material to match the v-shaped band and then bias bind the top edge.
2. Lay the v-shaped pocket band on the pocket fabric, folding a 1cm seam alloance under and sew at the bottom edge. Cut the pocket material to match the v-shaped band and then bias bind the top edge.
 3. Now you can see how much free space you have on the pocket, it's time to add your decoration. I free-hand-embroidered some text and appliqued a little white felt camper van (i added little black buttons for wheels at the end so they didn't get in the way of stitching.) because mamma mia is a lover of all things "camper".
 If you do go for hand embroidery it is a good idea to bondaweb some material to the back of the pocket fabric after you've finished stitching, to cover and secure all the threads, as the clothes pegs could catch and pull on this.
 4. Now pin the pocket to the base fabric, sew round the three sides of the pocket, rounding off the corners, and do a horizontal inch-long row of stitches on the bias binding in the middle of the v-shape to hold the pocket closed in the centre. This makes it feel like 2 pockets but it is still just one.
5. Bias bind around the 3 sides of the base fabric as shown below.
 6. Take the waist ties and sew them end-to-end on either side of the front waist band. With the right side inside, fold in half width-wise to give one long piece. Now at one end, sew the end closed and sew up the waist tie until 1 inch before the gingham section, do the same with the other end. Now turn the two waist ties right-side out and iron them flat.
 7. Slide the top edge of the base fabric into the opening in the gingham waistband section and press under a 1cm seam allowance front and back. Sew gingham section closed, securing top edge of base fabric inside.
 8. Sew some chunky ric-rac over the waist seam at the front of the apron and you're finished!
 9. I don't usually label things that I sew but i felt that this apron needed something else to balance the design, so i fabric stamped a little "house of spoon" label (with simple home-made eraser stamps) and attached it to the pocket band on the right hand side.
And then it really was finished!!!


2 comments:
Good to see the apron on your model, when I'm weariing it I can't see it. I just enjoy its purpose. I am now washing everything in the house whether it needs it or not just to use my apron for hanging it up to dry!!
(It's worth all the work for the pleasure it brings.
Mama xoxo
hehehe brilliant! it looks fantastic spoon, so 50's! And your writing is fantastic, very pro-mum :P
I'm doing loads of washes actually, but what have we learnt? close the doors THEN put the money in...(caught out double) hehe
Really like seeing the progression of the items, not that I've resources here to follow tutorials but it's like a make over show - turn scraps of material into something gorgeous!!
Well done! xx
Post a Comment